- What is a project timeline? It’s a visual tool for tracking project tasks, resources, milestones, and dependencies to ensure successful project delivery.
- How to create a project timeline? Follow six steps: define project scope, create a work breakdown structure, break deliverables into tasks, assign tasks, establish dependencies, and set key milestones.
- Why should anybody avoid spreadsheets for timelines? Spreadsheets are limiting for managing complex dependencies and collaboration, requiring manual updates and risking miscommunication.
- How does Wrike enhance project timelines? Wrike streamlines task assignment, visualization through Gantt charts, centralized communication, and automates workflow from project intake to delivery.
- What are the benefits of using Wrike? Improved collaboration, customizable dashboards for task tracking, and reduced project turnaround times, making it ideal for complex projects.
A project timeline is vital for visualizing how and when a project will get done. It allows you to track tasks, resources, and milestones, as well as understand how dependencies impact different phases. Timelines are particularly useful for complex projects and portfolios, where missed deadlines and confusion can affect cross-team workflows.
In this guide, you’ll learn how to create a project timeline from scratch. We’ll explain everything you need to include in your timeline — resources, stakeholders, dependencies, milestones, and more — and how they interrelate.
We’ll also explain why one classic way of creating timelines — using spreadsheets — doesn’t cut it anymore. Then, we’ll introduce you to Wrike, our project timeline software, which brings everything you need for an effective project timeline into one place.
6 steps to create a project timeline
To track the progress of your project using a project timeline, you must first plan specifically what to include in that timeline. This involves clarifying what needs to be achieved, when, and by whom, and how those tasks relate to each other.
You can do this in six key steps:
1. Determine the scope of the project
The first question you need to ask is a simple one: What is it you need to achieve, and by when? The answer determines the scope of the project, its length, and how much time you have for individual tasks.
It’s helpful to answer this question with a project scope statement. This is the definition and ultimate goal of your project, expressed as clearly as possible. For example, your general scope statement should be as simple as:
- Produce a research report into consumer attitudes to AI in three months.
- Develop an architectural plan for a new building project by 1 June.
- Launch a new Google Ads campaign in four weeks.
With this statement, your project is already taking shape, with a timeline, a final deliverable, and a sense of who might need to be involved. Any task that does not help you achieve this project goal in this time frame is out of scope and therefore doesn’t belong in your project.
2. Draw up a work breakdown structure (WBS)
With the scope defined, you can then outline a work breakdown structure (WBS) to plan your major project deliverables. A WBS divides up a project into smaller work packages and gives you insight into everything that goes into delivering on your scope statement.

To create a WBS, break down the project’s major deliverables. In the AI report example we’ve used above, these deliverables could be:
- Research team completes consumer research
- Writing team finalizes the report copy
- Design team produces a draft report
- Legal team approves the report
- Project lead gives final approval
This gives you a sense of what needs to be produced and by whom. Just as importantly, it gives you a hierarchy of tasks in chronological order, so you can get an idea of what needs to come first. If you want to see in more detail how a WBS works and how to draw one up, we’ve designed a work breakdown structure template to help.

3. Break down your deliverables into smaller tasks
With your work packages outlined, your next job is to break those deliverables down into concrete and discrete tasks.
For instance, look back at those deliverables we outlined in step 2. Those aren’t actually tasks, per se — a team can’t go out and simply ‘complete consumer research.’ For a task to be valuable, it needs to be finite and able to be completed by a single individual.
For instance, to complete consumer research, the research team needs to:
- Write research questions
- Edit those questions
- Identify research participants
- Interview those participants
- Compile results
Can these tasks be broken down further?
For example, ‘edit research questions’ might involve one person proofing the grammar and another giving final approval. These are two separate tasks.
4. Assign tasks to teams or individuals
Equipped with a list of tasks, now assign each one to an individual who will complete it. In very small teams, that will be obvious — you may have just one writer or one designer.
However, in more complex organizations, you might need to assign tasks based on specific individuals’ time commitments, capacity, and any conflicts with other projects or tasks. As we’ll share below, this can get very complicated if you’re managing your projects manually using a spreadsheet.
5. Establish dependencies and estimate task durations
There will always be tasks that certain teams or individuals won’t be able to kick off unless other tasks have been completed. These are known as task dependencies, and identifying these keeps your timeline running smoothly.
For instance, a project timeline will tell your writers that they won’t be able to write the copy until the research has been completed. However, it can signal to designers that they can start drawing up certain visuals without such a dependency.
When drawing up your project timeline, you’ll need to understand these dependencies and estimate how long each task is likely to take. While a task may take only a day’s actual work, that work may need to be spread out so resources can be deployed and external clients can respond, for instance. As we’ll show you below, a Gantt chart can be useful here. These are designed to map out tasks and dependencies with clarity that spreadsheets can’t provide.
6. Set key milestones
One of the final parts to set up in your project timeline is your project milestones, the key tasks that demonstrate progress within your project. These are useful for showing clients and other stakeholders you’re on track and to ensure alignment between teams. They’re convenient moments to review your budget, resources, and your overall timeline.
In smaller projects, milestones may just be the project’s start and end dates — there’s no need to add milestones if the project is of a limited size. For large projects, it can be useful to use the deliverables that you outlined in your WBS in step 2. For instance, completing the research itself may be an important milestone, or finalizing the copy.
Why a spreadsheet won’t be enough to build a complex project timeline
Once you’ve established your project milestones, you’ll have all the information you need for a successful project. Now, it’s your moment to build out the project timeline itself (i.e., the visual tool that will help you track your project’s progress).
Organizations commonly use a spreadsheet. With shared software like Google Sheets, this can give all team members a central reference point where they can see the project. However, it has serious limitations for this type of visual.
If you’re an organization managing more complex projects, you’ll encounter some frequent issues when trying to build a timeline in a spreadsheet:
- You’ll need to establish tasks, dependencies, and milestones yourself. While a project timeline template can help you arrange all your different tasks, every project will be custom to your specific organization. That means you’ll inevitably have to fiddle with spreadsheet cells and formulas to set up your timeline. Plus, you may not be able to interlink different tasks to give yourself a full picture of dependencies.
- You’ll inevitably have to use other tools alongside your spreadsheet. In a spreadsheet, you can attribute a task to someone but you’ll usually need to use another channel to provide them with a brief and any details. Any feedback or collaborative discussion needs to happen in a different tool, too. But before you even get to that point, you’ll need to check who has the capacity for those tasks, inevitably taking you to another tool to find that information.
- You’ll have to manually track your progress and edit your timeline as you go. Your spreadsheet won’t automatically update as you progress throughout your project. For your timeline to be an actually useful resource, someone will need to regularly make sure its information is up to date.
In short, spreadsheets are not designed for this kind of work. They’re fiddly, they’re not built to be collaborative, and they can be really difficult to edit if you need to change tasks, dependencies, or deadlines. Overall, for larger organizations working on more complex projects, managing a project timeline through a spreadsheet is a job in itself.
In the next section, we introduce an alternative: Wrike, a project timeline management software that brings everything you need to plan and track a project into one place.
The timeline view in Wrike was always really great because you could visualize it, you could simply drag and drop, you could slide the dates over, and you could create dependencies in a graphical way, as opposed to having to go through a bunch of UI. Just being able to literally grab the arrow and drag it was always really helpful.
Phillip Hoffman, Senior Program Manager
How Wrike makes creating and managing a project timeline easier
Wrike is built to improve collaboration between teams that are working on multiple complex projects. Through Wrike, all the projects you’re planning or working on can be clearly defined, tracked, and visualized. They can be simply broken down into tasks and subtasks to be easily assigned.
As you’re working on your project, you’ll see that Wrike isn’t just a static timeline either. Instead, you can bring together everyone who’s involved in the project into Wrike’s workspace, where they can communicate, share resources, and edit the timeline if necessary.
What’s more, thanks to Wrike’s automation, you don’t need to build out a new project timeline every time you get a work request. Rather, once you’ve set up the software, Wrike can automatically assign tasks and build dependencies for you.

Here are four ways that Wrike helps you plan and do your work, taking you beyond simple project timelines.
1. Build your project timeline in just a few clicks
Unlike a spreadsheet, Wrike makes it easy to create a robust and comprehensive project timeline:
- Set up custom tasks and milestones that reflect the way you want to work. Many project management tools let you name tasks and edit their status, but they don’t give you full control over the structure of your work. With Wrike, you can build projects to fit the way you work with a completely flexible structure.
- Assign tasks and give team members all the information they need. With just two clicks, you can add a team member to a given task. That task will appear in their dashboard along with all the details about that task, meaning there’s no need to email or ping them on Slack. Once they’ve completed that task, anyone with dependent tasks will be automatically notified.
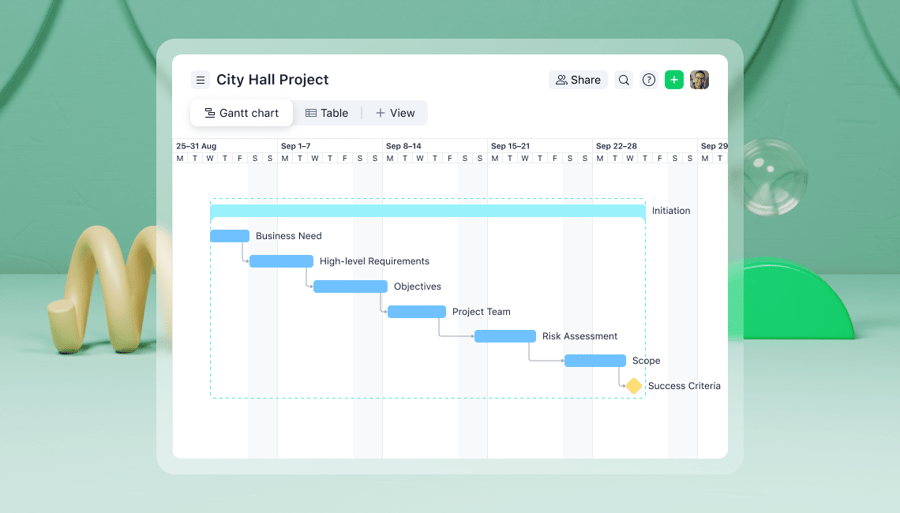
- Set, edit, and view dependencies. Draw up how every task relates to all the others. Then, throughout the project, these tasks can be viewed and edited in real time with Wrike’s Gantt Chart view (Note: a Gantt chart is a visual display that’s used to track and manage a project’s schedule and dependencies).
With Wrike’s Gantt Chart view, you can see all your projects in a clear and aesthetically pleasing format:

2. Bring all communication about projects directly into Wrike
Without a unified platform to manage and work on projects, communication is tough. Teams may be using a project management timeline tool while still communicating over email, Slack, phone, and comments in Google Docs, Adobe Creative Cloud, and elsewhere. This is how information gets lost and alignment suffers, even if your timeline itself is impeccable.
With Wrike, you can bring all your communication together into one single platform. Every update on a project’s status can be sent through Wrike itself, meaning there’s no need to scatter messages across channels. 
(Plus, Wrike offers integrations with the likes of Google Docs and Adobe Creative Cloud, meaning team members can work completely naturally within Wrike.)
The Swedish appliance brand, Electrolux, managed to reduce the emails it sent by 50% by using Wrike. Even more impressively, it reduced the amount of time spent on individual projects by 30% after using the platform.
“We were getting info in emails, PowerPoints, chat functions, meetings, Excel files, and on Post-its,” Global Packaging Manager Ella Rudebeck explained. “It was really hard to keep track of all the changes if you had to look through different email chains or if you weren’t in a meeting where a decision was made. We just felt the whole process was very ineffective.”
The team knew they’d benefit from an online work management platform and, after trying some alternatives, they chose Wrike.
“Now, everyone can see all the files all the time so no one has to ask to see the files via email or chat, and you automatically know if someone has uploaded a new file,” Rudebeck said.
Johan Alm, Design Coordinator at Electrolux, added: “It’s also time-efficient for us to have all the necessary information and material for our projects in one place. As the manager, I can assign people to every task, and it’s clear for everyone what kind of action they need to take with each project. They know when the deadline is, what they need to do; they can see the timeline in the Gantt chart as well.”
3. Track progress in dashboards that are customizable for every user
Everyone’s perspective on a project is different. Each individual has their own tasks with different dependencies, as well as their own priorities. It’s common for teams to be working on multiple projects at the same time and they need to see what’s most pressing for them.
When a user enters Wrike, within one click they can view their dashboard.

Here, individual team members can see the tasks that are assigned to them, what their team members are working on, and how these tasks relate to the overall project. It serves them a personalized view of what each team member specifically needs, while giving them visibility over other relevant tasks.
Plus, it means that all of the project-critical information is stored in the same place, so they don’t have to flick between apps in search of information.
4. Automate project timelines from intake to delivery
Most project management tools require you to build out a project timeline every time work gets requested. As a project manager or team leader, this means you’re spending a lot of time on repetitive work.
Instead, Wrike can automate the whole process for you. A team — say your marketing team, for example — can set up a dynamic intake form so that every time someone requests work, the entire workflow is set up from start to finish.
The system will establish dependencies and triggers and can even automatically assign specific tasks to individuals based on their capacity and expertise. The best part? These request forms are completely customizable to your specific needs. You can set up what questions to ask, which team members to assign tasks to, and much more.
Choose Wrike to manage all your projects
In this post, we’ve shared the key steps to building a project timeline. If you’re on a small team working on simple projects, you may be able to draw one of these up using a basic tool like a spreadsheet. But if you’re working on larger, more complex projects, or multiple projects at the same time, it’s smart to use a project timeline software like Wrike.
This way, you’ll bring all your project tasks and dependencies together, streamline your communication, and allow everyone to see clearly what they need to work on next.
Book a demo to find out how Wrike can work for you.
Without Wrike, it’d be difficult to make sure the right projects are getting started and that we have all the details we need.
Nicole Fakhri, Manager of Continuous Improvement