
Key takeaways:
- What is a project plan template? This is a structured guide that outlines tasks, timelines, and resources for effective project management.
- How do templates save time? They provide a pre-existing framework, significantly reducing initial planning efforts.
- Why is consistency important with templates? Templates standardize information, allowing team members to easily find critical details across projects.
- How do templates help reduce overwhelm? Templates offer a structured approach that simplifies the planning phase, making it less daunting.
- What methodologies can be applied? Options like Agile, Waterfall, and Work Breakdown Structure each provide unique approaches to project execution.
A project plan is an essential part of any project manager’s toolkit and helps save money and resources. However, creating one from the ground up can be time-consuming and inconsistent across teams. That’s where project plan templates come in.
Project plan templates provide a ready-made structure that helps organize projects, maintain visibility, and guide your team from kickoff to delivery. In this article, you’ll find 13 project plan templates to help you streamline the project planning process and keep every project on track.
What is a project plan template?
A project plan template is a ready-to-use structure that helps you map out tasks, timelines, and resources to get your project from start to finish. Instead of writing a project plan from scratch, a project plan template is a prebuilt framework that you can reuse and customize to fit different teams, workflows, or project types.
If a project plan is a roadmap that details the steps and resources needed to complete a project, then a project plan template is the reusable blueprint that includes key project details so you’re not building a new project plan every time.
Watch this quick explainer video to see how to write a project plan that keeps your team aligned and your goals on track.
Project plan template comparison chart
Choosing the right project plan template depends on your project goals, team structure, and preferred workflow. The chart below compares some of the most popular template types, including Kanban boards, RACI charts, and more.
| Template type | Purpose | Benefits | Drawbacks |
| Waterfall project template | Lay out tasks and phases in a fixed, sequential format from start to finish | Clear scopes, deadlines, and approval stages | Inflexible if timelines or requirements shift mid-project |
| Agile project template | Plan work in sprints or iterations with room for fast changes and collaboration | Flexible and responsive; team-friendly | Too fluid for projects that need strict timelines or structure |
| Gantt chart template | Visualize tasks, timelines, and dependencies in a bar chart format | Great for tracking deadlines and overlapping tasks | Can feel cluttered with too many layers |
| Kanban board template | Track work visually by status (e.g., “To-Do,” “In Progress,” “Done”) |
Easy to use and update; good for daily task management |
Not built for long-term or milestone-focused planning |
| Timeline template | Highlight key milestones and project phases over time | Helpful for stakeholder overviews and high-level planning | Doesn’t show ownership or task details |
| Work Breakdown Structure (WBS) | Break a project into smaller, manageable deliverables | Clarifies scope and organizes large efforts into bite-sized pieces | Doesn’t track time or status unless paired with another format |
| RACI chart template | Define who’s responsible, accountable, consulted, and informed | Improves clarity and accountability across teams | Can become complex with too many roles or overlapping responsibilities |
| Change management plan |
Document how to handle shifts in scope, process, or roles |
Helps teams stay aligned during transitions | Requires upfront planning and buy-in |
| Creative brief template | Outline goals, messaging, target audience, and deliverables for campaigns | Keeps creative teams aligned and focused from the start | Needs regular updates for fast-moving projects |
| Action plan template | Detail the specific steps, owners, and deadlines for achieving a goal | Keeps momentum going; helps break down larger initiatives | Can get too granular without linking back to larger project timelines |
| Budget tracker template | Monitor planned vs. actual spend across your project | Prevents overspending; improves forecasting accuracy | Needs frequent updates to stay accurate |
How to choose the right project plan template
Not sure which project plan template to use? Start by considering your project’s complexity, scope, and team structure. Here’s a quick breakdown to help you decide:
- Large, multi-phase projects: Use a Gantt chart or work breakdown structure (WBS) to stay on top of timelines, dependencies, and milestones.
- Agile or fast-paced teams: Choose an Agile or Kanban board template to support quick iterations and regular updates.
- Smaller projects or deliverables: Go with an action plan or creative brief for a lightweight, easy-to-follow structure.
- Cross-functional teams: Use a RACI chart to clarify roles, avoid overlap, and keep accountability clear.
- Shifting priorities or organizational change: A change management template helps guide teams through transitions with structure and alignment.
Choose the template that gives your team enough structure to stay focused without adding unnecessary complexity.
13 project plan templates (Use cases + downloads)
If you’re tired of starting every project from a blank page or dealing with scattered planning, these project templates can make a real difference. Whether you’re managing a detailed product launch, a fast-paced marketing campaign, or a quick internal project, the right template helps you plan faster and stay organized.
Below, we’ve listed a range of different project planning templates to help you find the one that’s best for your current and future projects.
1. Agile teamwork template

Is your backlog growing by the minute? An Agile project management template helps teams plan, track, and deliver work in short, iterative cycles. It’s designed for flexibility and makes it easy to adjust priorities as new information comes in.
This type of template typically includes sprint planning boards, backlog views, and space for regular retrospective meetings. It’s a great fit for fast-moving projects where collaboration and continuous improvement are key.
2. Work breakdown structure (WBS)
When a project feels too big to manage, breaking it down is the smartest way forward. A work breakdown structure (WBS) template helps teams break complex projects into smaller, more manageable components.
It provides a clear hierarchy of tasks and subtasks. This makes it easier to define scope, assign responsibilities, and track progress.
This template is especially useful for large or multi-phase projects that require detailed planning and precise coordination across teams.
3. Action plan template

No matter your project approach, success comes down to how well you execute the details. Whether you’re in charge of an Agile, Waterfall, or hybrid project, tasks need to be managed strategically. An action plan template provides a clear roadmap for execution by breaking down high-level objectives into actionable tasks.
This template is ideal for smaller initiatives or short-term projects that need focused, task-level planning to maintain momentum and accountability.
4. Creative brief template

5. Gantt chart template
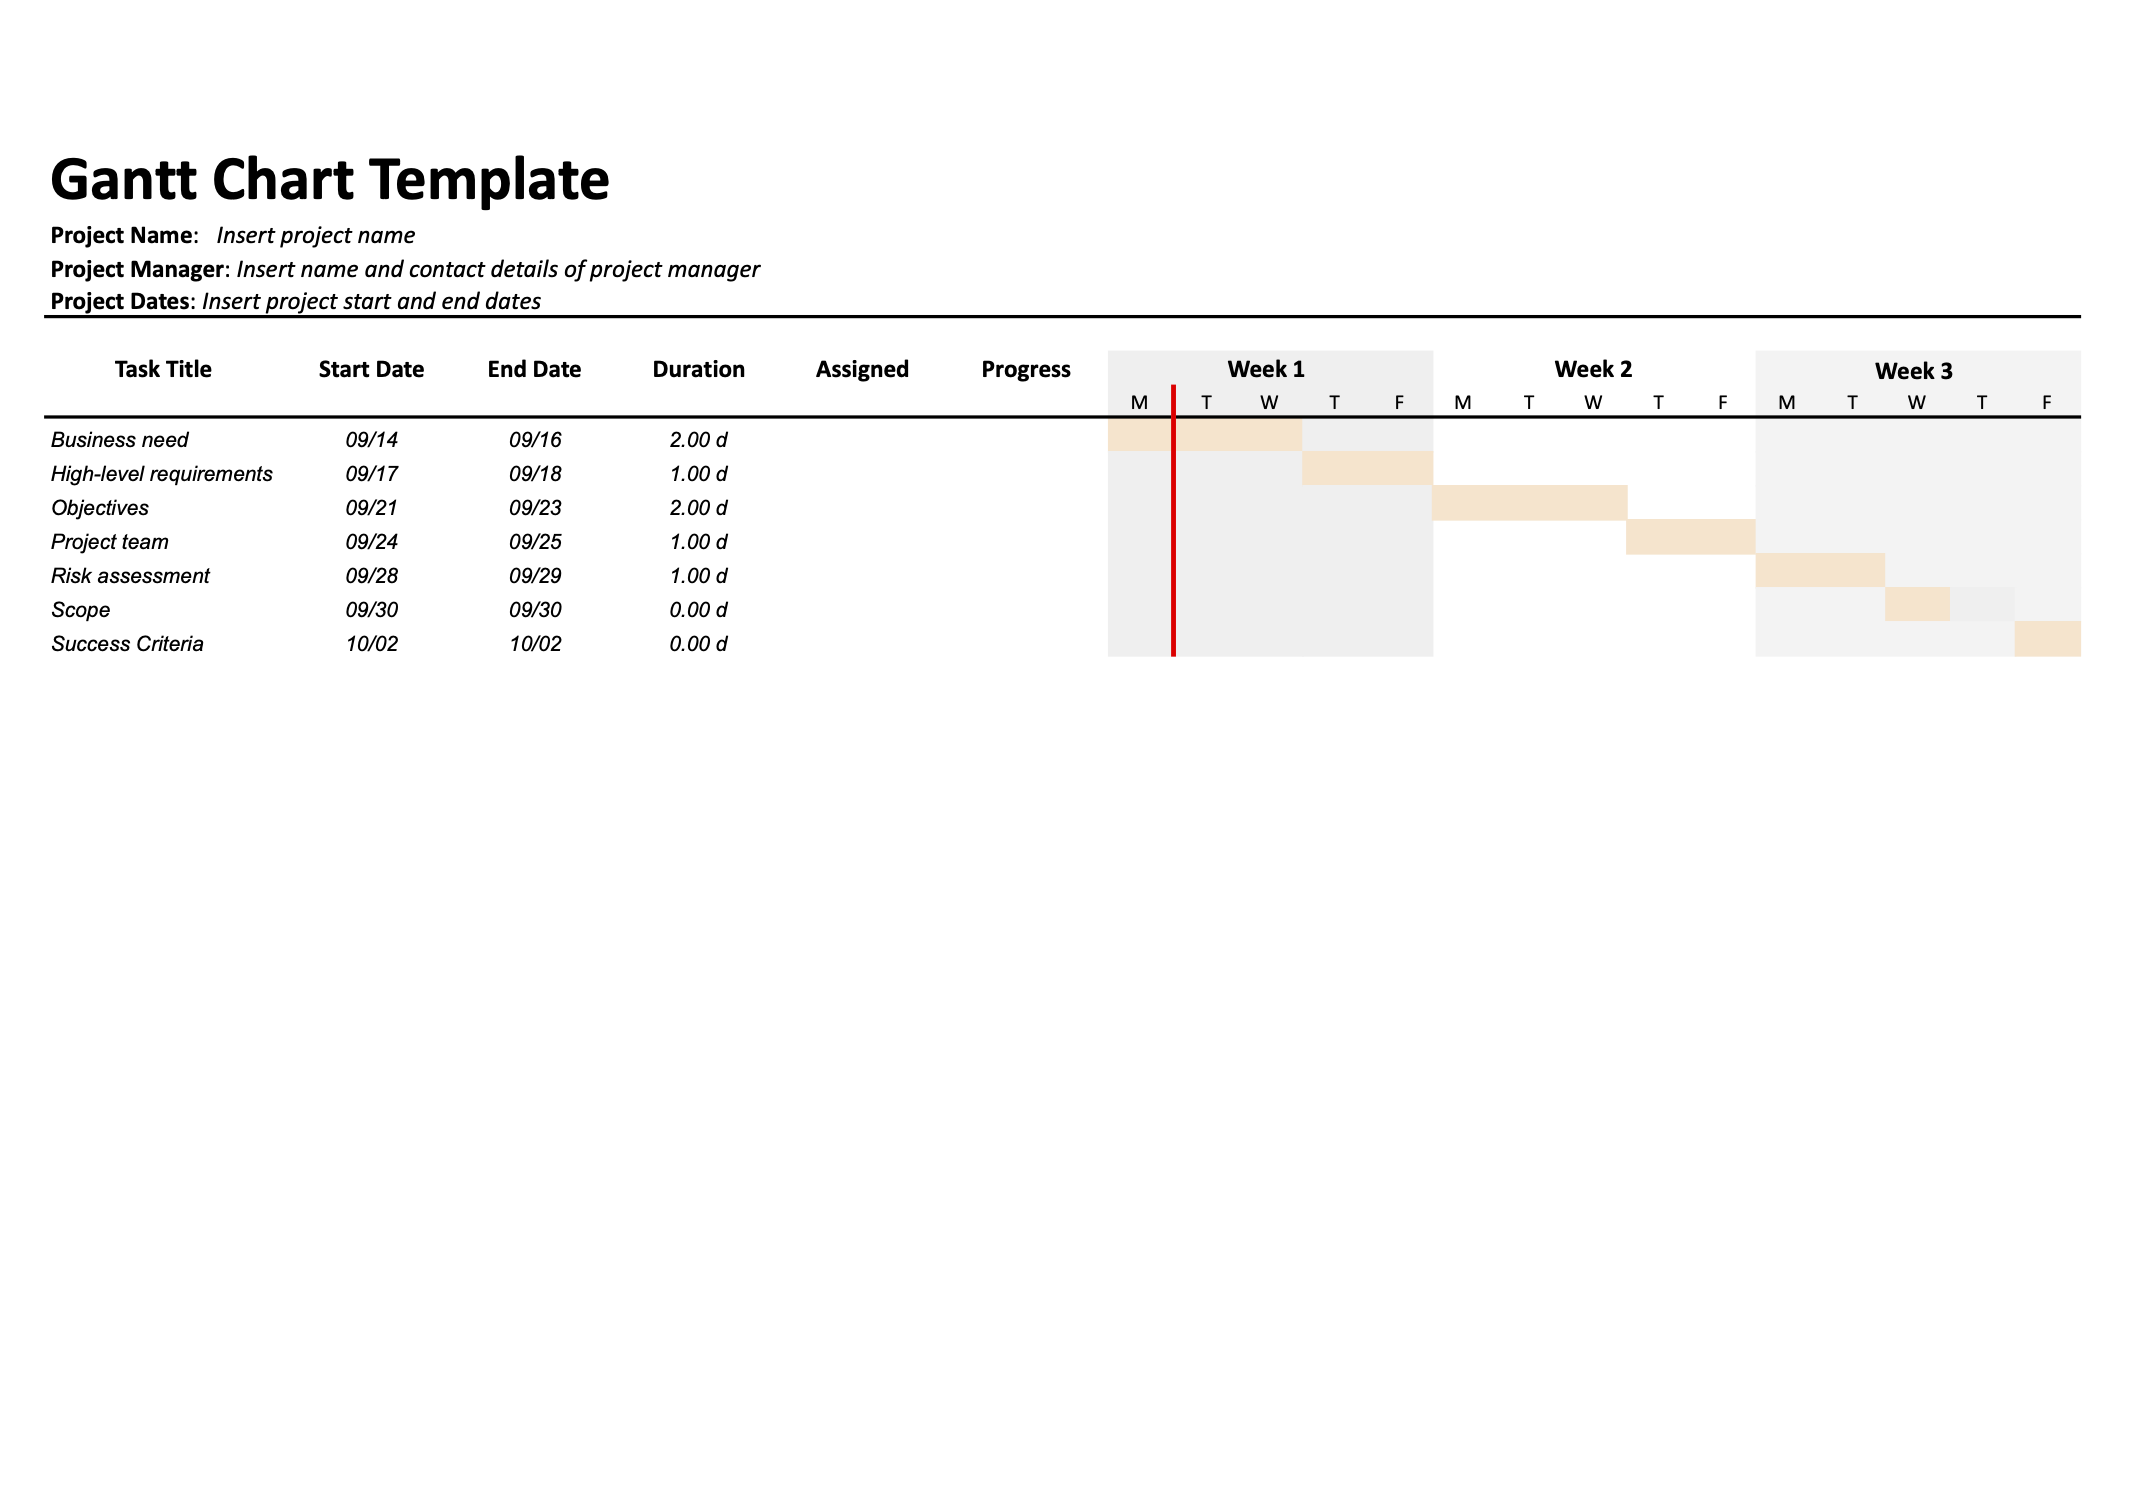
When timing is everything, visibility matters. A Gantt chart template offers a visual timeline of project tasks, durations, and dependencies, making it easier to plan, schedule, and monitor progress. It helps teams see how tasks overlap, identify potential bottlenecks, and stay aligned on deadlines.
This template is ideal for projects with fixed schedules, multiple phases, or resource-heavy workflows that require detailed time management.
6. Kanban board template

This template is best suited for teams that need a flexible, easy-to-update system for managing ongoing work and maintaining a steady flow across tasks.
7. Event planning template

This template is ideal for marketing, operations, or admin teams managing everything from webinars to large-scale conferences.
8. RACI chart template

This template is especially useful for complex projects with multiple stakeholders or when roles and responsibilities need to be clearly documented.
9. Change control process template

Unplanned changes can derail even the best project plans unless you have a system to manage them. A change control process template helps teams manage and track project changes in a structured, consistent way. It centralizes all change requests, outlines clear workflows for review and approval, and prioritizes actions based on impact and urgency.
This template is ideal for teams that need to adapt quickly while maintaining visibility and control.
10. Budget tracker template

Keeping track of your budget shouldn’t feel like a full-time job. A budget tracker template helps you monitor spending, set financial goals, and stay on top of your expenses. It reduces errors, keeps finances organized in one place, and uses built-in formulas to automate calculations.
This template is ideal for anyone looking to save time, stay consistent, and make smarter budgeting decisions with less manual work.
11. Meeting notes template

It’s easy to leave a meeting unclear on what was decided or who’s doing what next. A meeting notes template solves that problem by giving you a structured way to capture key points, action items, and follow-ups in real time.
It helps turn every meeting into productive progress and ensures nothing gets lost once the call ends. Ideal for team syncs, client check-ins, or project reviews, this template keeps everyone on the same page.
12. Executive summary template
An executive summary template helps you present key project details in a clear, concise format for stakeholders and decision makers. It outlines the project’s purpose, goals, timeline, budget, and high-level outcomes.
This template is ideal for reporting to leadership, aligning teams quickly, and keeping focus on what matters most without overwhelming your audience with too much detail.
Download this blank template to create your own executive summary.
13. Sample project plan template
The project plan example template below is designed to give you an idea of how to create and customize your own template for your next project. Specifically, this example focuses on an eBook project.
The bullet points include ideas about what to include in each section of an eBook project plan template — things that may be the same from one eBook project to the next. Although adjustments might be needed for each specific project, using a template means that project managers won’t have to start a project plan from scratch for future work.
Here goes:
-
[Create eBook]
-
[Define the purpose and goals of the eBook]
-
[Identify the target audience and key takeaways]
2. Project scope
-
[Outline the content scope and structure of the eBook]
-
[Specify the length, format, and design elements]
3. Project budget
-
Research costs: [Amount]
-
Writing costs: [Amount]
-
Editing costs: [Amount]
-
Design costs: [Amount]
-
Publishing costs: [Amount]
-
Miscellaneous costs: [Amount]
-
Research and planning: [Start date] – [End date]
-
Writing: [Start date] – [End date]
-
Editing: [Start date] – [End date]
-
Design and formatting: [Start date] – [End date]
-
Publishing and distribution: [Start date] – [End date]
5. Project milestones
-
Research completed: [Date]
-
Draft completion: [Date]
-
Editing completed: [Date]
-
Design finalized: [Date]
-
eBook published: [Date]
6. Project tasks and subtasks
-
Research and planning
-
[Conduct market research]
-
[Develop eBook outline]
-
[Determine pricing strategy]
-
-
Writing
-
[Draft chapters]
-
[Revise drafts]
-
-
Editing
-
[Proofreading]
-
[Implement feedback]
-
-
Design and formatting
-
[Create cover design]
-
[Format eBook for different devices]
-
-
Publishing and distribution
-
[Choose publishing platforms]
-
[Set up distribution channels]
-
7. Project dependencies
-
[Complete research before writing]
-
[Finish writing before editing]
-
[Finalize editing before design and formatting]
-
[Design and formatting must be completed before publishing]
8. Team roles and responsibilities
-
Project manager: [Name]
-
Writer: [Name]
-
Editor: [Name]
-
Designer: [Name]
-
Publisher: [Name]
9. Risk assessment and management plan
-
Potential risks: [Missed deadlines, budget overruns, quality issues]
-
Mitigation strategies: [Set buffer times, maintain a contingency budget, implement a quality control process]
10. Project performance metrics
-
[Track progress against milestones in a status report]
-
[Monitor budget adherence]
-
[Evaluate eBook quality through feedback and reviews]
With a project plan template like this, you’d be able to bring it out at the start of any eBook project to make the planning phase smoother. Different types of projects may require modified approaches, and the way you fill in each bullet will vary, but this sample gives you a solid idea to adapt as you need.
Why use a project plan template?
Project plan templates start with a proven structure that keeps tasks, timelines, and responsibilities organized from day one. It also helps set expectations early, align your team faster, and reduce the risk of missed steps or miscommunication.
With the right template in place, project managers spend less time on setup and more time leading projects to the finish line.
Essential elements of a project plan template
A strong project plan template gives you the structure you need to organize work, guide your team, and stay on track. While templates can vary based on the type of project, here are a few key elements you’ll typically want to include:
- Project goals and objectives: What are you trying to achieve? This sets the direction and keeps everyone aligned.
- Tasks and deliverables: Break the work into clear, manageable steps so nothing gets missed.
- Timelines and milestones: Map out key dates to keep your project moving and flag important checkpoints.
- Roles and responsibilities: Clarify who’s doing what to avoid confusion and delays.
- Resources and budget: Outline what’s needed. From tools to team members, and how much it will cost.
- Dependencies and risks: Identify what could impact your timeline or success, and plan around it.
- Progress tracking: Use fields or dashboards to monitor statuses and keep everyone in the loop.
With these elements in place, a plan becomes more than just a checklist. Now, it’s a central hub for execution, collaboration, and results.
Ready to run successful projects with project plan templates?
Project plan templates take the heavy lifting out of setup, so you can focus on execution, alignment, and results. Whether you’re managing a quick campaign or a large-scale initiative, the right template helps you stay organized and keep your team on track.
If you’re managing complex projects, you might also explore project management plan templates for more comprehensive coverage. With the right structure in place, planning becomes faster, smoother, and far more effective — no matter what you’re working on.
FAQs about project plan templates
Which project plan template best fits my project’s size and complexity?
The right template depends on how much structure and visibility your project requires. For large, multi-phase projects, a Gantt chart or Work Breakdown Structure (WBS) works best. For smaller or fast-moving projects, an action plan or simple project plan may be more effective. Choose a format that matches your team’s workflow and your stakeholder needs.
How do visual tools like Kanban boards enhance project planning templates?
Kanban boards give you a real-time view of task progress, helping teams manage their workloads and maintain momentum. By organizing work into columns like “To-Do,” “In Progress,” and “Done,” these boards make it easier to spot bottlenecks, prioritize tasks, and keep everyone aligned.
What are the advantages of using a stakeholder mapping template early on?
A stakeholder mapping template helps you identify who’s involved, what their expectations are, and how to keep them informed. Using it early helps reduce misalignment, improves communication, and ensures key voices are heard throughout the project.
How can a RACI matrix improve clarity in team roles during projects?
A RACI matrix defines who is responsible, accountable, consulted, and informed for each task. This removes ambiguity, prevents duplication of work, and ensures that everyone knows their role — keeping projects running smoothly.
Why should I consider a simple project plan for quick, strategic initiatives?
Simple project plans are ideal for fast-turn initiatives where speed and clarity matter more than complexity. They help you focus on key objectives, assign responsibilities quickly, and execute without overloading the process.
How do I choose between a work plan and a scope of work template?
Use a scope of work template to define what’s being delivered and the boundaries of the project. Use a work plan template to map out how those deliverables will get done — including timelines, tasks, and owners. The scope sets direction; the work plan handles execution.
How can a status report template improve my project communication?
A status report template keeps everyone informed on progress, blockers, and upcoming milestones. It simplifies updates for stakeholders, reduces back-and-forth, and builds trust by providing consistent visibility into the project’s health.
Does Microsoft Excel have a project plan template?
Yes, Microsoft Excel offers basic project plan templates, including Gantt charts and task trackers. They’re useful for getting started quickly, but for more complex needs like collaboration, automation, or real-time updates, you may want to explore dedicated project management tools.