- What are the key challenges teams face in project management? Examples include disconnected tools, siloed departments, and unclear processes hinder effective collaboration.
- How can a project management workflow enhance teamwork? It clarifies responsibilities, enables effective communication, and saves time on repetitive tasks.
- What essential steps should be followed for effective project workflows? List tasks, gather resources, assign roles, and visualize progress to maintain project momentum.
- Why is Wrike recommended for project management? Wrike offers customizable, automated workflows that streamline communication and improve project visibility.
- How can teams assess and refine their workflows in Wrike? Custom reports and feedback forms help teams evaluate performance and improve processes for future projects.
Work today is complicated. Teams are facing barriers. Disconnected tools, siloed departments, and unclear processes make it harder to get work done. Without the right workflows, it’s easy for miscommunication and missed deadlines to creep in.
A project management workflow is more than just a roadmap for work; it’s a mechanism for driving the completion of connected tasks, responsibilities, and timelines. An effective, automated workflow (or set of workflows) helps you execute a project plan, maintain the momentum of your team’s work, and ensure everyone’s managing their tasks effortlessly.
When planned and implemented properly, you can use a project management workflow to:
- Clarify accountability for each task
- Enable team members to communicate and share resources effectively
- Save time on repetitive tasks
- Create a record so you can reflect on project success or failure
Some teams try to create workflows like to-do lists. Others try to put complex workflows into action using a range of different interlocking tools. But for large projects that involve multiple teams or departments, this approach to project workflow management — which is really just task management — leads to bottlenecks, missed deadlines, and miscommunication.
Here, we’ll give you a step-by-step guide to planning and implementing effective project management workflows. We’ll break down the classic project planning process, looking at common pitfalls to avoid. Then, we’ll show you how to use Wrike to create, customize, refine, and review your project management workflow process. Finally, we’ll highlight three project management workflow examples in the form of Wrike templates.
How to plan and implement a project workflow (step by step)
Building an efficient project management workflow is a step-by-step process.
It starts with defining the project scope and the outputs, goals, or objectives you’re working toward, and ends when you evaluate the experience after the project goes live.
Companies often approach this in a sequence of steps involving four key stages.
1. List all tasks
Most managers start planning the workflows for a new project by listing the jobs to be done, putting them on a project timeline, and structuring the project into phases or milestones.
They break complex tasks into smaller subtasks and identify task dependencies — the jobs that rely on the first task being approved before work can start on the second.
It’s pretty easy to start listing the essential tasks that will soon make up your workflow, but this foundational step can quickly spiral.
For example, it can be difficult to define tasks where the endpoint is hard to measure, or plan for task dependencies before you have a clear idea of due dates. And, if your project involves different departments — for example, if you’re carrying out the staff onboarding process, you’ll need input from recruitment and HR — the leaders in one team might struggle to identify all the jobs the other teams need to complete before each phase of the project can begin.
2. Gather and record your tools and resources
Your team will need access to all kinds of internal resources (such as software, meeting spaces, and office supplies) as well as external resources (such as hired equipment, client data, and freelance specialists/agencies). Project planners also need to have an overview of the personnel who are available to come on board, sometimes called “human capital.”
Without an accurate understanding of the resources you have and the gaps you need to fill along the way, it’s impossible to complete a project and remain on track. Delays in the first phase — for example, if your marketing team is waiting for design assets from the graphics department — will have a knock-on effect on timings for the rest of your project.
Consider your resources as puzzle pieces in a single, unified workflow. When you know exactly which tools and people you have, it’s easier to connect the dots and keep progress flowing.
3. Assign roles and responsibilities
Delegating tasks and making sure everyone understands who’s accountable for the different areas of your project makes it easier to collaborate, communicate, and get the deliverables right. To delegate well, project managers and team leaders need an accurate overview of the skills and capacity within their team before they start to assign tasks and milestones.
But, however well you plan, changes within teams are inevitable during a large or lengthy project. When this happens, a good workflow must be able to adjust the responsibilities — for example, transferring task ownership to another person. Along with automation, design, and reporting (more on how Wrike handles all these things later), this flexibility is an important part of effective workflow management.
4. Visualize your project progress
You can’t manage a project effectively without an overview of the sequence of tasks, the progress you’re making, and the overall project status.
Some teams like to visualize their process maps as a Waterfall diagram or flowchart where completed tasks trigger new ones. Others prefer Kanban board methodology, where each task is represented by a card that moves through the process. And there’s always the option of a Gantt chart, a popular project management tool for tracking deadlines, dependencies, and simultaneous tasks.
Companies across different industries use these four steps to create a beautiful plan for their project workflow but then run into problems as soon as the project begins:
- Some have checklists for managing individual tasks, but no real way of visualizing how each task flows into the rest of the jobs to be done. This makes it harder to anticipate and respond to any problems that may surface throughout the project.
- Others have an intricate workflow that visualizes their task sequences and dependencies, but their team spends hours manually writing messages, CCing different people, and waiting for approvals whenever they complete a task.
- Sometimes, a company has a process for every aspect of their work, especially when they’re using multiple platforms. For example, it might send files to Google Drive while moving a Trello card and writing an email to explain the document to the person who needs to review it.
This way of working can keep projects ticking along, but it’s not the most effective way — and it doesn’t help your team do their best work together. It’s far too easy to miss notifications, lose track of the most recent version of resources, and let things fall through the cracks.
If you truly want to take control of project management — and every part of the project itself — an all-in-one, flexible, automated project management platform is a far better solution.
Build an intuitive, collaborative workflow with Wrike
Work flows with Wrike. With our intelligent work management software, you can manage every aspect of your project, from ideation to delivery and beyond, thanks to intuitive, customizable workflows tailored to the way your teams work best.
When Fitbit used Wrike during its launch process, it spent 50% less time on project management specific to timeline building and saved 200 hours that would previously have been spent tracking marketing materials.
And when Kalexius, a legal services company, switched to Wrike, it gained 360° visibility on all the work performed in the firm and cut the time spent in meetings in half.
Now that I have seen how work can be organized with Wrike, I could not go back to managing my work from emails or a paper to-do list.
Stella Petersen, Head of Legal Operations
Our award-winning platform is the only project management software you need to plan, implement, evaluate, and improve your team workflows, whether that’s the process for a single item on your checklist or the way you run an entire project.
When you need to create a workflow for a new project, Wrike makes it simple to list jobs, delegate them, and bring new team members on board. But it does far more than this. In a custom Wrike workspace, you can:
- Build an interconnected workflow that reflects how every task feeds into the others, then monitor your progress as the task statuses change
- Eliminate information silos and duplicate file versions thanks to shared resource folders within Wrike
- Put your project in motion and maintain a fresh, comprehensive overview of the steps every team is taking
- Save countless hours on communications, approvals, and file sharing through cross-tagging, workflow automation, and over 400 integrations
Plan and assign every detail of your project
Project managers love the way Wrike builds workflows tailored to their team and their goals.
Within your Wrike workspace, you can create projects with connected resource folders and invite all your collaborators to join in, even if they work in a different department or global division of your company.
Let’s start by looking at some different strategies for breaking projects into smaller tasks within a Wrike workspace.
Imagine your team is focused on writing a proposal for a potential new client. Chances are, you’ll have to:
- Research the needs of the company you’re pitching and clarify what you can offer
- Plan, outline, and organize your proposal with input from other people in your company, such as consulting your finance department to set the budget
- Write and edit the proposal and approve it internally
- Send the proposal to the client or present it to them in person
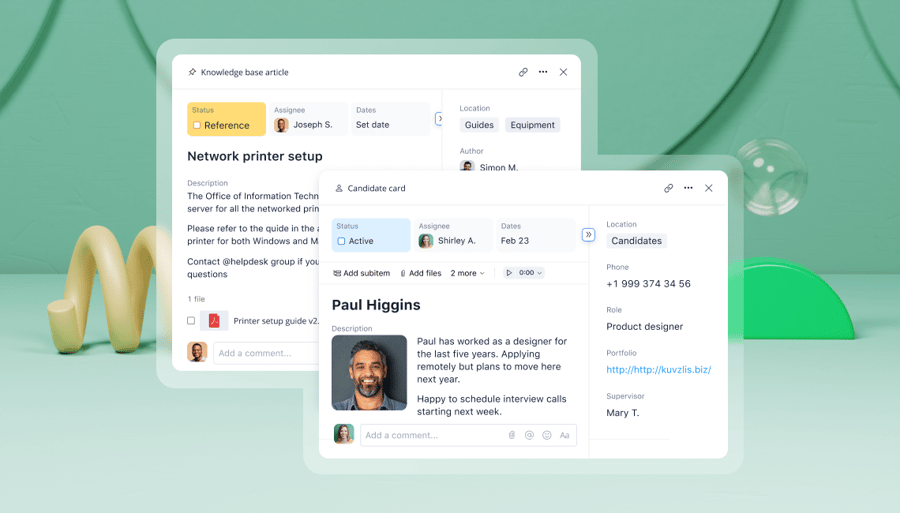
All these can become tasks within Wrike. Simply click the + button at the top of the workspace, select Task, name it, and assign it to the folder, project, or space of your choice.
However, the list of tasks above still represents hours of work and potentially dozens of people across your company. With Wrike, you can also convert larger tasks (like ‘Complete proposal research’) into milestones that structure the timeline and break smaller tasks (like ‘Approve project budget’) into a workflow of subtasks.
You can even use Wrike’s generative AI functionality to auto-suggest subtasks, adjust them, and add them to your workflow.
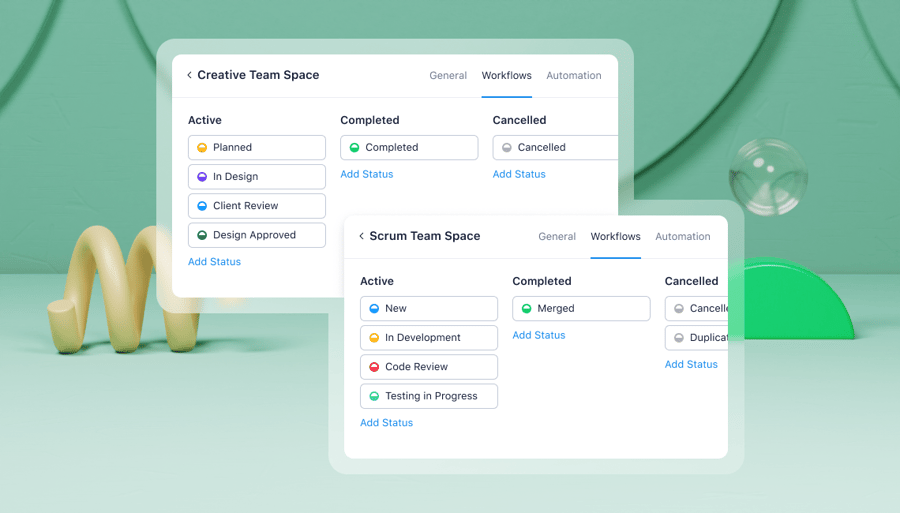
As well as standard tasks, you can use Wrike to define custom items that fit the unique business processes your team follows every day. The difference between these various types of tasks lies in the different statuses they move through and the workflows they automatically trigger when you add something new to your list.![]()
The difference between a task checklist and a workflow is the ability to visualize the way these tasks affect each other. Once you have your list of tasks, Wrike makes it easy to define the associated task dependencies and build a full project workflow plan.
Just bring up your task list in the Gantt chart view, click on the task you want to connect, and drag your mouse across to the task it relates to. Once someone completes the first task, alters the deadline, or stretches the timeline, the schedule for dependent tasks automatically adjusts.
This eliminates human error and you won’t have to write any emails, either. Everyone who’s tagged in the relevant tasks will be notified automatically when the timeline changes.
Once you’ve mapped out your project, defined how tasks relate to each other, and understand the workflow behind each task, you have more than just a progress tracking checklist: you have the accountability and flexibility to execute a whole project.
Execute your project workflow(s) and collaborate effectively
Wrike makes project execution effortless, regardless of how complex it is and how many stakeholders are involved. Our users particularly love the following features:
1. Workflow automation
Wrike’s powerful workflow automation saves time on repetitive work so your team can focus their energy where it’s needed.
Wrike’s workflow automation is based on dependencies and triggers. Suppose one of your teams is working on a new design asset for social media. By applying intuitive when/then rules to the task, you can automatically notify an individual or an entire team when the task changes status. For example, when you change the task status to ‘Review required,’ Wrike automatically notifies the team leader with a comment asking for their input.
As well as tagging users within Wrike, you can integrate your workflow automations with the other tools and platforms you use, like Mailchimp, HubSpot, or your calendars. For example, if the due date for the design project is coming up and the status is still listed as ‘In progress,’ you can create an automation to send the team a Slack message 48 hours before the deadline to check they’re still on track.
Compared to manually writing individual messages to ask for progress updates or renaming new versions of files, an automated workflow helps save time, reduce errors, and keep your project running smoothly.
2. Cross-tagging
Wrike’s unique cross-tagging system is a game changer for collaborative workflows. Cross-tagging lets you share a task or a work item (like a file or a report) across multiple points in your project workflow, and even with different departments or external resources.
The same work then exists in multiple spaces and multiple personal dashboards, but it’s never duplicated. Plus, when the status of a cross-tagged task changes, stakeholders are notified automatically and they’ll have access to any new files associated with the project without having to request access or search for the updated assets. 
This reduces the amount of time you spend in standup meetings and means that anyone who misses check-ins can catch up easily further down the line. After adopting Wrike for its marketing projects, Moneytree used cross-tagging to increase visibility as it developed new comms materials. It sped up marketing projects by 75% and cut the approval process from seven days to just one.
Wrike kept everything organized and transparent, so it was always very easy to see the status ... because of the tagging feature we were able to keep things moving very quickly.
Alex Bacon, Marketing Project Manager
3. Dynamic request forms
Wrike’s dynamic request forms allow everyone to get the information they need in one form. They’re super easy to create and complete. Each type of request form can automatically fire off a workflow and even assign task owners automatically, too.
Simply select Create a Request Form, write a description to help users understand how to use it, and specify the information you need. For example, to return to the proposal project example we mentioned above, you could send a request form to your client for more information on the project requirements. Your form could include:
- Single-answer question fields about the nature of their business
- A checklist of the potential problems they want to solve
- A section for them to detail their current solutions
- An attachment field for them to upload additional information
These details can all be automatically added to the relevant project folders once the request form is sent back, so every project team member can access the resources they need immediately.
4. Dashboards
You can set up your Wrike workspace to include team and private dashboards where everyone can view the project status.
Dashboards are extremely versatile — just choose from our selection of template dashboard widgets or customize a widget to filter the project tasks in the way that works for you.
Widgets can build a dashboard that shows starred tasks, tasks by status, tasks due this week, or overdue or unassigned tasks that need immediate attention.
Teams that collaborate on Wrike also love their private dashboards, where they can monitor the tasks they have on their plate (for example, with a widget showing every item that’s assigned to them). In your dashboard, you can view your notifications and visualize your tasks in charts or workflow diagrams that help you structure your day.
5. Workload charts
During the planning and implementation stages of your workflow, project managers or team leaders can also use workload charts to assist with resource management. After receiving an overview of their team’s capacity, managers can assign tasks and adjust the plan based on real-time information.
Workload charts can give you an overview of specific users or user groups (like the department members who belong to the same workspace, or the people assigned to a specific project). Or you can use the workload view to monitor up to 300 users involved in different areas of the project. 
With these essential features, you can monitor your workflow, adjust it as your project moves forward, and start to gather the insights you need to develop your process.
How to assess and adjust your workflows before the next project
Project leaders need to reflect on how their team is working so they can respond to challenges before they derail the work (and improve their process for next time). Another key difference between Wrike and simple task management platforms is the amount of data Wrike gathers on your project status and the way you can use it to analyze and optimize your work.
There are two great ways to assess your workflow in Wrike.
1. Generate custom reports on your project’s status
When you manage your project in Wrike, you can generate custom reports to evaluate your workflow. From real-time weekly reports that keep your project on track to reports that evaluate the entire project, this is the easiest way to find what’s working, change what’s not, and help your team produce their best work.
Let’s say your team has been working with a new external client and you want to find out how the number of hours they’ve spent on the project matched up to the number of hours you planned for in your initial pitch.
To create a report, just go to the Reports section in your sidebar and select + Custom report. Choose the filters you want to apply to the data — for example, the time your team has tracked on a specific project. 
You can also generate project status reports weekly (for example, ahead of a check-in with your team leaders) so you can predict bottlenecks, find the parts of the project that are starting to drag, and identify the team members that have too much on their plate.
For example, if your reports show that the tasks in your finance team’s billing process often stall at a certain status, you can remove redundant tasks from that workflow or bring more team members on board to help. At the other end of the spectrum, when your reports show that a part of the project is working particularly well, you can apply that strategy more widely — for example, by saving a particularly effective task workflow as a template.
Coma AG, a digital marketing agency, takes advantage of Wrike’s reports to try new strategies and react to the changing needs of its client base. The added transparency gives the team the confidence to work flexibly and keep their business viable for the future.
It is important for us to react flexibly to the requirements of our customers. We are thoughtfully applying new ways of working to increase our flexibility, and we are carefully considering how and where new methods are useful. Thus, we offer our customers the best quality work, and remain viable for the future.
Martin Kirmaie, Technology Director
2. Gather feedback with request forms
Detailed feedback written by the people you worked with — especially the team who got to know the project well — is also invaluable for improving your business processes.
At the end of the project, you can also use request forms to gather feedback from everyone who was tagged in the project. This is an easy way to gather detailed insights that can help you scale up and tackle more complex projects in the future.
When you add these elements of reflection to your project management, you get a workflow that continuously improves and helps you manage and support your team.
3 automated Wrike workflow templates to use with your team
There’s no need to create a project management workflow from scratch when you’ve got Wrike in your corner. Our automated workflows are completely customizable, so you can build a workflow that helps your unique team complete their tasks and activities in the way they work best together. To get up and running even faster, use Wrike templates to kick off different types of projects.
Wrike Team, Business, Enterprise, and Pinnacle pricing plans include specially designed project management workflow templates to set up new workspaces quickly. Depending on the use case, each template includes projects, sample tasks, dashboards, reports, prebuilt request forms, and more.
1. Sprint planning workflow template
Clearing your sprint backlog needs accountability, clearly defined priorities, and effortless time tracking. Wrike’s sprint template creates a new workflow map to monitor your progress, and a folder dedicated to the tasks to focus on during the sprint.
2. Creative asset production workflow template
Design teams might see requests for dozens of assets, in multiple formats, each with a different deadline and contact person. 
When you use this template as a starting point, you can:
- Create automated request forms to act as design briefs for your team
- Visualize multiple deadlines and content calendars in a Gantt chart
- Organize assets and track versions in folders
- Use Wrike’s proofing and approval functionality to finalize assets, including easy sharing and communication with external stakeholders
This template helps creative teams cut down on repetitive handoffs and manual approvals — it’s all streamlined in one place. From the first design brief to final sign-off, you maintain flow and avoid chasing random emails or Slack messages.
3. Product launch plan workflow template
Product launches have several moving parts that need multiple teams to align. Wrike’s launch plan template is ideal for breaking these milestone moments into actionable tasks and planning the workflows for each phase in detail.
- Pre-launch: Break the launch into tasks and assign them to teams, job roles, or individuals to ensure no steps are missed.
- Launch: Check the status of each part of the project, ensure tasks are approved, and monitor the overall progress to set (and meet) the deadline for the launch.
- Post-launch: Gather feedback on the success of the launch with a request form and create task templates for your next new product.
Wrike: Create intuitive, custom project management workflows
Great workflows lead to great outcomes. A project management workflow reduces friction, automates repetitive actions, and keeps progress visible to everyone involved. With Wrike, you can do more in less time without sacrificing quality or clarity.
Wrike gives you much more than just a simple way to list and assign project tasks. You get a full project management and workflow management system, helping you visualize the moving parts of each project but also, and more importantly, execute the work, respond to changes, and eliminate communication issues that disrupt timelines and cause delays.
You get a truly customizable workspace, where you can create and manage unique workflows that are intuitive to the way your teams operate.
Teams from global brands like Sony Pictures, Electrolux, and Fitbit use Wrike to collaborate and deliver successful projects. Ready to choose the project management workflow template that works for you? Book a free demo with our sales team today.