- What is a workback schedule? It’s a project management tool that maps out tasks in reverse order, starting from the delivery date back to the project start date.
- How does Wrike enhance workback scheduling? Wrike provides modern tools that simplify task management, resource allocation, and timeline adjustments.
- Why are realistic deadlines crucial in project planning? A workback schedule helps spot unrealistic deadlines, ensuring achievable timelines and reducing the risk of overpromising.
- What role do resources play in a workback schedule? Identifying and allocating the right resources early on is essential for efficient project execution and risk mitigation.
- How can teams improve accountability with workback schedules? Clearly defined responsibilities and deadlines foster better team communication and commitment to project success.
If you’re ready to tackle project planning without a headache, consider having a solid workback schedule. It is your project’s roadmap, guiding you from the finish line back to where you started. This approach flips traditional planning on its head, starting with your end goal and working backward to plot out every step needed to get there.
The real deal happens when you bring modern project management tools into the mix. These tools are game changers, simplifying every phase of your workback plan. They’ve got you covered, from setting milestones to allocating resources and adjusting timelines.
And the best part is that you don’t have to be a project management guru to get it right. Wrike makes it super easy for anyone to create a robust workback schedule. It helps you bring efficiency, clarity, and calm to the often chaotic world of project planning. With Wrike, you can visualize each step, keep track of progress, and ensure your project stays on track from start to finish.
Read on to discover just what a workback schedule is, as well as how to develop a workback schedule template for your team or organization to help you get projects up and running faster.
Listen to this article
What is a workback schedule?
A workback schedule is a tool used to map out a project’s life cycle and its major phases in reverse order — that is, from the delivery date back to the project start date. If you’ve ever been given a project to manage with nothing more than some parameters or guidelines and a due date, then you’ve probably already used a workback schedule, even if you didn’t realize it at the time.
In that scenario, you likely pulled up your calendar, made a note of the deadline date, and then started working backward to determine when you’d need to have the major project milestones accomplished in order to be ready for delivery by the deadline. Essentially, a workback schedule is a way to reverse-engineer a project based on a given time frame for delivery.
Project workback schedule example
Let’s assume you’re tasked with planning a major corporate event. It’s a significant project with a fixed event date, making it an ideal candidate for a workback schedule. Let’s walk through how a workback plan could bring this event to life.
Using a workback schedule, you start by marking the event date as your endpoint. Then, you work backward from this date to schedule and allocate tasks.
- Final preparations: In the final weeks leading up to the event, your focus is on last-minute details. This might include confirming guest numbers, finalizing catering arrangements, and ensuring all audio-visual equipment is tested and ready.
- Vendor coordination: About two months out, you’re deeply coordinating with various vendors. This includes finalizing contracts with the venue, caterers, and entertainment.
- Initial planning: In the early stages, six months before the event, you’re setting the foundation. This involves establishing the event’s theme, initial vendor outreach, and creating promotional materials. You also identify and book the venue, which dictates many subsequent actions.

How to create a workback schedule
To create a workback schedule, you need a comprehensive understanding of your project’s final deadline and a keen eye for detail. Here’s how you can craft a workback plan that ensures project success.
1. Outline the project’s scope
In this initial step, gather your team and stakeholders to discuss and agree upon the project’s objectives and deadline. This collaborative approach ensures everyone is on the same page, setting the stage for a unified effort toward a common goal.
2. Identify required resources
After establishing your end goal, the next step is identifying all the resources you’ll need to bring your project to life. Resources are the building blocks of your project — they can include a diverse mix, from team members and their unique skills to the financial budget, technology, and other tools required.
Careful resource identification and allocation is key. For instance, the people involved bring skills and expertise, while technology and tools enable efficient execution. Finances, of course, are the fuel that powers your project forward.
Taking the time to assess and secure the right resources thoroughly sets a strong foundation for your project. It also helps avoid last-minute scrambles or project roadblocks due to missing or inadequate resources.
3. Organize deadlines with the delivery date first
Now that you’ve pinpointed the necessary resources, it’s time to organize your deadlines, starting with the final delivery date and working backward. This reverse-engineering approach ensures that every step of your project aligns precisely with the end goal.
Begin by breaking down your project into smaller deliverables and milestones, then map them out in reverse order from your deadline. This method highlights potential conflicts or resource issues, giving you a clearer picture of the project timeline. By planning in reverse, you’re setting realistic deadlines and creating a safety net for those inevitable project hiccups.
4. Add time estimates to all tasks
Time estimates are the heartbeat of your project plan. Assigning a realistic duration to every task ensures your project stays on track from start to finish. To nail this step, you should consult with subject matter experts or stakeholders who have hands-on experience with similar tasks.
Begin by listing all tasks identified in your plan. For each one, assign a time estimate that reflects how long it will take to complete. If you’re unsure about a task’s duration, don’t hesitate to contact those with the necessary expertise. Their insights can be invaluable in creating a reliable and realistic project timeline.
5. Identify dependencies among tasks
In any project, the completion of one stage often triggers the start of another. Start by reviewing all the tasks you’ve listed. Ask yourself: Does a task rely on the completion of another? Are there any prerequisites that need to be met before a particular task can begin? These questions help you map out the relationship between different tasks.
For instance, you can’t begin the design phase of a project if the research part isn’t completed. Or, you might need certain approvals before you can move forward with a task.
Again, consulting with subject matter experts and stakeholders is invaluable. They can provide insights into how tasks intertwine based on their expertise and experience. This helps you create a more accurate and comprehensive plan.
6. Consider holidays and non-work days
When piecing together a project plan, it’s easy to overlook holidays and non-work days, yet they play a role in the success of your schedule.
Start by marking your project calendar’s national, local, and company-specific holidays. Consider individual team members’ time-off plans that might affect the project flow.
Incorporating non-work days into your workback schedule does more than prevent deadline clashes. It ensures a more humane and realistic approach to project planning, respecting team members’ time and public holidays. This saves you from last-minute scrambles and ensures a smoother, stress-free project.
7. Ask your team to review the workback schedule
The team review is the final yet often overlooked step in creating a workback schedule. It invites the perspectives of those directly involved in bringing the project to life.
Encourage an open and collaborative review session. Let your team members scrutinize the schedule, checking for any overly ambitious deadlines or potential workload underestimations. This step engages your team, making them feel valued and heard. It fosters a sense of ownership and commitment toward the project and builds trust and transparency within the group.
Implementing workback schedules with project management tools and templates
Incorporating workback schedules into your project management arsenal is a game changer, and leveraging the right tools and templates can amplify its effectiveness.
Using project management tools, such as Gantt charts or interactive dashboards, transforms your workback schedule from a static document into a living, breathing part of your project. These tools provide a bird’s-eye view of your project’s timeline and allow you to monitor task progress easily. 
Templates serve as a starting point, especially for teams new to workback scheduling. They offer a structured approach, ensuring you cover all the necessary bases without starting from scratch. Platforms that integrate scheduling with team collaboration foster an environment where real-time updates, changes, and feedback are shared. This ensures everyone is always on the same page, reducing misunderstandings and enhancing team synergy.
Graphical representations of schedules, such as charts and graphs, provide a quick and easy way to gauge the project’s current status. They enable project managers and stakeholders to visualize progress, understand task dependencies, and make data-driven decisions.
Workback schedule template
Imagine having a pre-structured format that prompts you to fill in project details — this is what a workback schedule template offers. It simplifies identifying key milestones, assigning tasks, and setting deadlines, all while working backward from your end goal.
The template starts with the final deliverable and the deadline at the forefront. From there, you break down the project into its core components: major milestones, individual tasks, their dependencies, and respective deadlines. A workback schedule template is not set in stone; as your project evolves, the template can be tweaked to accommodate changes.

For a downloadable version of this template, click here.
The many benefits of a workback schedule
If you are managing a project with a strict deadline, a workback schedule should be your go-to strategy. It helps keep things organized, so you can hit those milestones without any last-minute panic. Here are the essential benefits of a workback schedule:
Assists in time management of the project
A workback schedule breaks down the final deadline into smaller, manageable tasks, each with its own deadline. This approach ensures that every phase of the project is given adequate time, reducing the risk of last-minute rushes. Mapping out the project from end to start provides a clear timeline and helps allocate resources efficiently.
Easier to notice unrealistic deadlines
With a workback schedule, teams gain a clearer understanding of the project timeline, helping to set more achievable deadlines and reduce the risk of overpromising and underdelivering. A workback schedule serves as a reality check, helping to spot and avoid unrealistic deadlines in project planning. By mapping out each task and milestone in reverse order from the project’s end date, it becomes evident where timelines may need to be tighter.
Helps in resource planning
By identifying the necessary resources from the outset, you establish a clear roadmap for the project’s life cycle. This allows for the efficient allocation of resources, be they personnel, materials, or tools. This method minimizes unexpected challenges and reduces stress for the project manager and the team.
Ability to mitigate risks
By outlining the project from end to beginning, a workback schedule provides a clear view of each task and its dependencies, allowing project managers to foresee potential obstacles and plan accordingly. This proactive approach to risk management enables teams to address potential issues before they become significant problems, ensuring a smoother project flow.
Better flexibility and adaptability
If something changes or you need more time for a task, you can quickly shift things around without messing up the whole plan. A workback schedule keeps the project flowing smoothly, even when surprises pop up. With a workback schedule, you’re ready to adapt and keep things on track, ensuring your project stays on the road to success.
Increased team accountability
Workback schedules show everyone their part in the project. Establishing proper accountability goes a step further than simply listing tasks, and instead shows exactly who’s doing what and when. This clarity is great because it means everyone knows their responsibilities and deadlines. The whole team stays focused, works together efficiently, and ensures the project crosses the finish line as planned.
Enhanced communication among all stakeholders
A workback schedule ensures that every stakeholder is on the same page, from the team members rolling up their sleeves to the decision makers overseeing the project. This means fewer misunderstandings, more efficient collaboration, and a smoother path to project completion. With everyone aligned and in the loop, the project moves forward cohesively, ensuring all voices are heard and integrated into the project’s success story.
What are the challenges of a workback schedule?
Perhaps the biggest challenge of a workback calendar is trying to schedule all the project’s necessary components and tasks for completion by the deadline when you are severely pressed for time. If you feel that meeting the proposed deadline while upholding your team or organization’s standards is simply unattainable, you need to have an honest conversation with the client or project stakeholder to discuss either pushing the deadline back or modifying the project so that it meets both the expected outcomes as well as the desired delivery date.
Some other challenges include:
Inflexibility
Workback schedules often show a tendency to be inflexible. Any unexpected changes can disrupt the entire plan when working with a strict sequence of tasks leading up to a fixed deadline. However, this doesn’t mean that workback schedules are set in stone. A good approach is to anticipate potential hiccups and have contingency plans ready.
Task estimate accuracy
Getting the accuracy of task duration estimates right is like hitting a moving target – it requires both skill and a bit of foresight. Overestimating task durations can lead to inefficient use of resources and a slower project pace. Underestimating, on the other hand, can result in rushed work and missed deadlines.
Monitoring and control
Implementing a workback schedule requires meticulous monitoring and control. Every task in a workback schedule is a piece of the puzzle andm if one task encounters a roadblock, it can create a domino effect, disrupting the entire project timeline.
Maybe you are completely new to this particular project, or maybe this is the first time you’ve had to manage a project under these particular parameters and constraints. In these situations, you should seek guidance from senior PMs and upper management who can help you determine viable workarounds and solutions for expedited delivery. Chances are they’ve been in similar situations and have hard-earned insight into getting the project done on time and to standard.
Using Wrike to create and implement a workback plan
One of the best ways to easily create a workback schedule with less time and fewer headaches is to use a workback schedule template. With Wrike, you can create custom templates and timelines for projects that you routinely manage, which will save you loads of time from the planning phase and help you get the project up and running as quickly as possible. Wrike’s project time tracking tools will also show you exactly how long individual tasks should take.
Let’s take a look at some of the other key features offered by Wrike:
Calendar view
When planning a project with a workback schedule, Wrike’s Calendar view is an indispensable feature for visualizing timelines. With Calendar view, you can:
- See your project’s milestones, tasks, and deadlines in a clear, visual format
- Easily adjust deadlines and tasks by dragging and dropping them on the calendar
- Show daily, weekly, or monthly views, depending on what’s most helpful for your project’s phase
- Share with your teammates to keep everyone on track

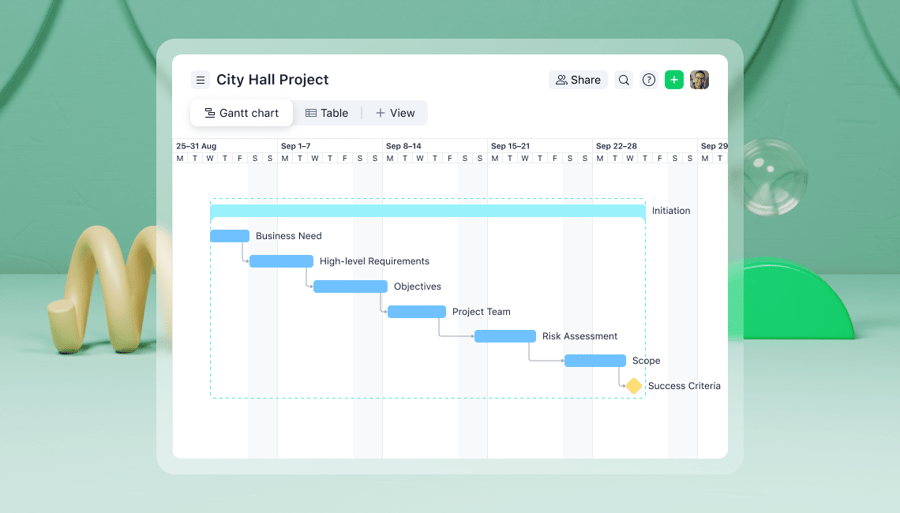
Gantt Chart view
Wrike’s Gantt Chart view is a powerful feature for anyone managing projects with a workback schedule. The Gantt Chart view helps you:
- Present all your project tasks, dependencies, and milestones in one view
- Understand how tasks are interconnected
- Keep an eye on key deadlines
- See the project’s progression

Board view
With Wrike’s Board view, tasks become interactive elements that move across the project’s life cycle.
In the Board view, each task is represented as a card that can be shuffled around to reflect its current status. This visual approach makes it easier to understand the project’s progress at a glance, offering a bird’s-eye view of where things stand.

Conclusion
So, there you have it – the ins and outs of creating and managing a robust workback schedule. Clearly, a solid workback plan is a must for any project aiming for success. By mapping out each task, keeping an eye on deadlines, and being mindful of resources, you’re setting your project up for a smoother ride.
Project management tools like Wrike are the game changers here. They take the guesswork out of project management and bring the type of clarity and control that takes time to achieve manually. With features like Calendar, Gantt Chart, and Board views, Wrike simplifies the creation of your workback schedule and ensures you stay on top of things as your project evolves.
Want to give it a shot and see just how easy Wrike makes project management? You can get started today with a free two-week trial.