No matter how well you prepare, not all of the plans you make in your business will work out as you intended.
Sometimes, you’ll be able to see an incident coming, such as a client quitting after they’ve complained on multiple occasions. Other times, your plans might be derailed by something completely unexpected — as we all found out during the pandemic.
When disaster strikes, a contingency plan can help your business respond intentionally, mitigate any losses, and get back on track as quickly as possible.
In this article, I’ll discuss the key features of a contingency plan, why you need one, and how you can use Wrike to create one.
What does a contingency plan consist of?
A contingency plan, sometimes referred to as a “plan B” or a “backup plan,” is a document that sets out what your organization will do in the event that something bad happens in the future.
These plans are an important element of ensuring risk preparedness.
Risks could be:
- A foreseen risk, such as your software taking a few hours to go back online after routine maintenance
- An unforeseen risk, such as a large client quitting out of nowhere
- A catastrophe, such as an extended power outage, cybersecurity breach, or natural disaster
Contingency planning normally involves two elements that are key to managing any project: the budget and the schedule.
- A budget contingency is extra budget allotted to a project to cover unforeseen extra costs, such as material price increases, emergency repairs, extra labor costs, or the cost of dealing with new regulations.
- A schedule contingency is extra time built into a project schedule to allow for unexpected delays, such as meeting overruns, supply chain disruption, personnel shortages, or management not giving approval on time.
Although the terms contingency plan and business continuity are often used interchangeably in risk management, they’re not the same thing.
- Business contingency plans are usually activated immediately after incidents, in order to mobilize the right resources and team members. They’re a short-term response to an incident.
- Business continuity plans are activated if a disaster goes on for a longer period of time. The aim of these plans is to facilitate the resumption of normal operations as quickly and efficiently as possible.
Why does contingency planning matter?
Murphy’s Law states that anything that can go wrong will go wrong. And the reality is, you can’t prevent bad things from happening to your organization from time to time.
What you can do is mitigate the risk of disaster by creating a series of contingency plans to help you identify risks in advance and recover from them.
Contingencies can help in times of crisis. Here are some key benefits:
- Recover from unexpected events more quickly because you have a series of steps to follow and don’t have to spend as much time in panic mode trying to improvise a solution.
- Maintain critical business functions like server uptime — again, because you’ve thought about ways to do this in advance of the incident.
- Boost the trust levels of customers, shareholders, and employees, because they see that you have an action plan for when things go wrong and respond professionally when they do. It’s also reassuring for employees to know they have a prearranged set of steps to follow in a crisis.
- Stay compliant with the contingency planning that’s mandated by local regulations and avoid penalties such as fines.
- Mitigate the financial costs of an emergency, such as lawsuits, churning customers, damaged infrastructure, or key employees leaving.
How to create a contingency plan: Your step-by-step guide
Hopefully, I’ve managed to convince you that it’s important to make a contingency plan for your business. Here are some tips on how you could go about doing that in practice:
- Make a list of all the most important processes in your businesses, especially the ones that allow you to create products for or deliver services to customers. For each process, list the things that are most likely to go wrong, based on your previous experience and understanding of the broader market.
- For each risk you’ve identified, consider how likely it is to happen and the potential impact on your business. You could measure impact in terms of duration, your bottom line, or the percentage of revenue that’s connected with the risk.
- Create contingency plans for the risks that you identified as the most significant. These should cover what triggers the contingency plan, what actions you will take, and who is responsible for each action.
- Share your contingency plan with employees to get feedback, and then share it with senior management so that they can sign off on it. Don’t forget to share it with the employees who are responsible for implementing it, as well as training those employees in how to implement it.
- Simulate an incident and see how well your contingency plan measures up. Continue to review your contingency plans at least once a year, and share any changes made with the teams responsible.
Wrike offers functionality that can help you with all these steps. But how exactly? I’m going to explore this in more detail below.
1. Map out key processes and identify the risks for each one
To start your contingency planning process, you’ll need to identify the risks to your business (or project). To do that, make a list of all your most essential processes. If you’re unsure which processes to include, you can simply go through your project management board in Wrike.
For example, if you run an e-commerce business, your processes could be:
- Product sourcing
- Product listings
- Google Ads
- Payment processing
- Shipping and fulfillment
- Customer service
- Your payment gateway could go offline.
- A client might try to commit fraud and use someone else’s card.
- A customer might dispute a payment and initiate a chargeback.
- Someone might fill in the incorrect billing information when checking out.
- Your system might not process refunds correctly, leading to customers getting angry.
Do you have a number of employees working on one big list of possible risks? Wrike’s collaboration features let multiple people work on the same document at the same time.
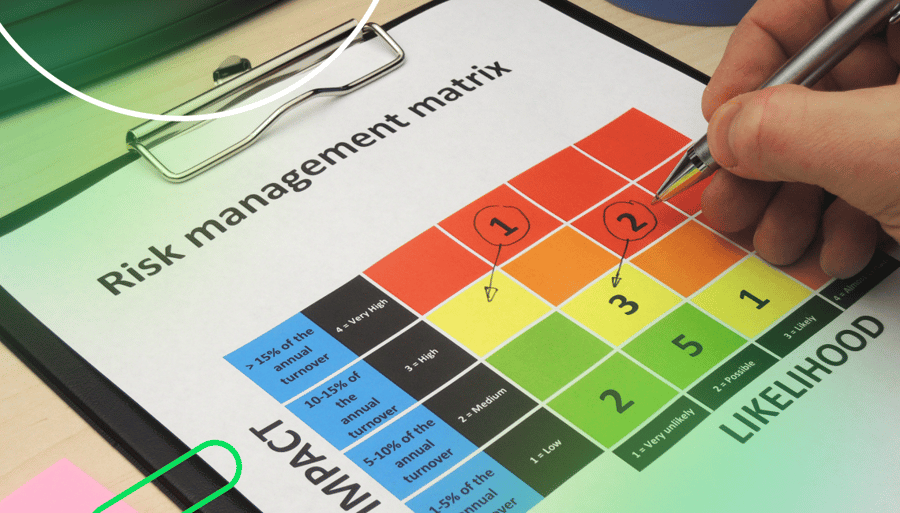
2. Evaluate the potential impact and likelihood of each risk
It would be too time consuming to create a disaster recovery plan for each risk you’ve identified. So, a better strategy is to only focus on the risks that are the most likely and pose the biggest threats to your business.
For each risk you’ve identified, assess how likely it is to happen and how severely it would impact your business. There are three ways you can do this:
- Qualitative risk assessment: This means rating the severity of each risk on a scale of one to 100, and then multiplying by the probability of it occurring.
- Quantitative risk assessment: This means putting a dollar amount on how much you could stand to lose in a worst-case scenario and an expected one, and then comparing the cost of mitigation before the incident against the cost of cleaning up after it.
- Business impact analysis (BIA): This means looking at how much revenue is coming from the business unit that’s at risk. The higher the percentage of revenue, the more urgent it is to create a contingency plan to ensure continuity of operations.
If you’re not sure where to start with any of those risk assessments, we have a risk analysis template that can help you get the ball rolling.

Wrike’s analytics can also help you gauge the likelihood of certain incidents happening. For example, if you run a services business, you can look back at past client engagements to see the probability of client churn by the month of the engagement.
Whichever method you use to assess risks, you’re looking to identify the ones that:
- Are most likely to happen
- Would impact business operations the most if they happen
- Would impact the business units that generate the most revenue
If the cost of mitigation is also much lower than the cost of cleaning up the mess after the fact, then you’ve found a great candidate for a risk that warrants creating a contingency plan.
3. Create contingency plans for the most significant risks
Next, you’ll want to create a contingency plan for each risk that you identified as significant in the previous step. Starting from the second contingency plan you create, you’ll be able to use Wrike’s templating features to build the first one as a template, saving you a lot of time and effort. 
- What can be done ahead of time to mitigate the adverse consequences of the incident
- What has to happen in order to trigger your contingency plan
- Your course of action immediately after the incident happens (Tip: Create a custom workflow)
- Your backup strategy if the incident or the fallout from it lasts weeks or months
- Who is responsible for which part of the response plan, and who will hold those responsible accountable (Tip: Use our RACI chart template)
- Which team members should be informed at each step of the process (Tip: Set up automated alerts)
4. Share the contingency plan
Once you’ve written your contingency plan, it’s time to share it with senior management so you get approval before the plan becomes official company policy. Doing this with Wrike is straightforward: simply create a task for leaders to review the plan and give them a deadline by which to do that.
You might also want to share your contingency plan draft with employees who are in the same department, just to get their feedback. For example, you could use Wrike to pin the contingency plan to the relevant project management board, ensuring that all relevant parties have access to it.
Thanks to Wrike’s collaboration features, employees who have feedback could then comment on the contingency plan inside the plan document itself.

Once the contingency plan has been finalized, you’ll also need to share it with the employees who are responsible for implementing it.
In many cases, this will require some degree of training, especially if this is a contingency for some sort of existential risk. You can use Wrike to schedule training sessions, and then subsequently attach training materials to each step within your contingency workflow, so that they’re easily accessible for anyone involved in execution.
5. Test the contingency plan and review it on a regular basis
Once your contingency plan has been approved by and shared with all the relevant parties, you’ll need to test it to make sure your crisis management works as intended.
To do this, run a simulation of the incident that this plan is designed to deal with, and see how it performs. If you need to let management know how well the testing went, you can use Wrike to write a report and send it to them.

Even if your contingency plan is working as intended when you test it, there’s no guarantee that this will remain the case.
- The market situation might change.
- The risk you created this plan for might become more significant, or less significant.
- Your internal personnel situation might also change.
As a result, you’ll want to audit your contingency plans at least once a year to make sure they’re still up to date. You can set up recurring tasks to do so in Wrike, and assign those tasks to the people responsible.

When you test and review your contingency plans, you’ll sometimes want to make changes to them. If that happens, make sure all the relevant stakeholders are set up to receive automatic notifications on Wrike, so that they stay in the loop.
Wrike makes creating contingency plans easy
Making a contingency plan doesn’t have to be hard. Rather than reinventing the wheel, it’s far more efficient to use Wrike and benefit from:
- Past contingency plan templates
- Asynchronous collaboration on notes about risks
- One central source of truth that stores all the updates from past projects
- An easy way to send notifications to managers when a contingency plan is ready to review
- Built-in reports that you can use to assess the effectiveness of your contingency plan
But don’t take my word for it. Sign up for a free trial today and see for yourself!