- What are Wrike request forms? Wrike request forms automate work intake and route requests to one centralized place, streamlining the process and enhancing control.
- How do request forms save time? They enable automatic creation of tasks, workflows, and projects, minimizing admin work and allowing immediate focus on impactful tasks.
- What can be launched using request forms? Request forms can launch blueprints for recurring tasks, automatically generating all necessary components like due dates and task assignments.
- How can one create a request form in Wrike? Navigate to your desired space, click on the gear icon, select “Request forms,” and follow the prompts to create and customize your form.
- How do conditional questions work in Wrike forms? You can set questions to be conditional, directing requesters to specific follow-up questions based on their previous answers.
Work requests can be big, or small, come in via email, direct message, conference call, and of course, the most dreaded — the "pop-in" request.
With a variety of channels, it can be chaotic and difficult to keep track of everything and what projects are high priority. Not anymore with Wrike’s custom request forms.
What are Wrike request forms?
Wrike’s request forms help you automate your work intake, route all requests to one place from internal and external customers, and ensure requesters provide the information you need. Translation: you have more control and can kickstart work immediately.

Request forms don’t just streamline work intake, they also enable you to create tasks, workflows, and entire projects automatically — saving you and your team hours of time.
Wrike request forms can also launch blueprints, which are templates for new work items and are designed to replicate recurring tasks such as writing a new blog post or press release. During this process, all necessary tasks, owners, and due dates are automatically created as well. When you create a project from a blueprint via the request form, project progress settings are preserved, along with the date and custom field rollup settings and the statuses of any subitems.
In the end, request forms and blueprints both increase efficiency, helping you save time and eliminate admin work so that you can start focusing immediately on more impactful work.
How to build request forms in Wrike
Step 1: Navigate to the space where you want to create a request form

Step 2: Click the gear icon in the top-right corner

Step 3: Select Request forms

Step 4: Click ’Create a Request form’ if it’s the first request form in the space, or + Form if the space already contains existing forms.

Step 5: Insert form information
- Enter a name for your request form
- (Optional) Provide a description for the form to help users understand what it’s for and when to submit it.
- Move to the right-hand panel and specify:
- The space your form should belong to
- Who should be able to see the form (everyone in your Wrike account, specific users and groups, or nobody in your account)
- If the form should create a new task or project, duplicate a task or project, or create an item from a blueprint

- Note: to create an item from a blueprint, first select ’Duplicate task’ or ’Duplicate project’ from this dropdown, then select ’template task,’ and finally, the ’blueprint’ tab.
- (Optional) Designate whether you want to enable a public link to the form (for non-Wrike users) and if it should trigger email notifications or contain a CAPTCHA security feature
- (Optional) Select the folder, project, or space where the items created via the form should be placed
- Note: If you don’t select anything at this step, the item created via form submission will be placed in the ’Shared with me’ folder
- (Optional) Select a status for the task or folder that will be created after form submission. If you don’t select a status, tasks and projects created via request submission will have the first active status of the workflow applied to the folder, project, or space where they’re created.
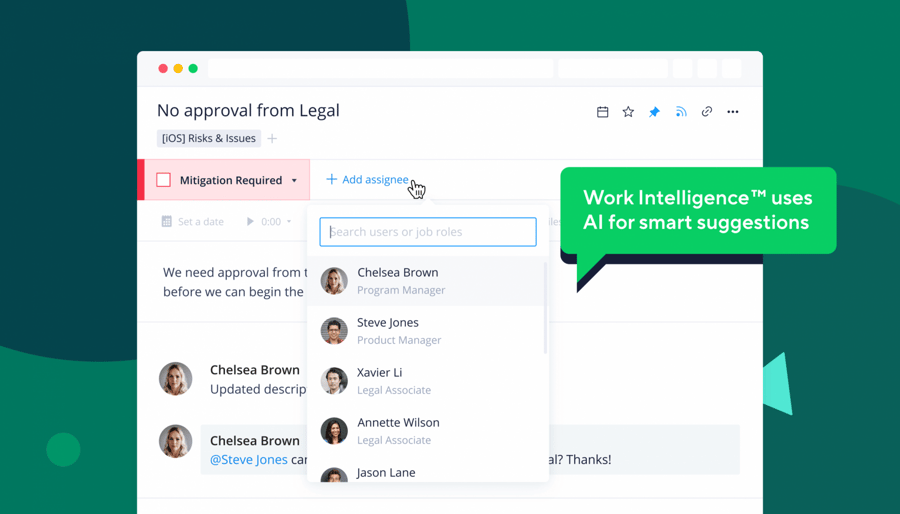
- (Optional) Select a user to assign the created task or project
- (Optional) Set up an approval to be created via the request form
- (Optional) Add a prefix. You can set a prefix for tasks and projects duplicated via a request. The prefix will be a specified answer and is added to all associated subfolders, subprojects, tasks, and subtasks upon submission.
Step 6: Customize form inputs
- After completing the steps above, click + Add question
- Select the question type you’d like to add from the dropdown menu

Step 7: Customization continued
- Enter your question and available answers (depending on the question type)
- (Optional) Enter ’helper’ text to add additional information about the question. This information is visible to requesters but won’t appear on the resulting task or project.
- Click ’Required’ to make a given question mandatory to complete and submit the form.
- You can also make questions and answers in your request form conditional, so requesters are redirected to different questions based on their form inputs.
- You can also map responses telling Wrike how to use certain answers in the created task or project
- Publish or save your new request form

How will you use Wrike request forms to organize work?
For more details and to learn more about Wrike’s request forms, visit our help center. To set up an approval process in Wrike, please take a look at this how-to article.