You have dozens of helpful project management methodologies to choose from, but the basics are the same. You break down the project into manageable parts, develop a checklist to assign work to your team, and track that work to monitor progress. Calendars and emails are great for maintaining your project schedule. These tools reveal their limitations as projects grow, however, and planning, scheduling, and controlling work gets more complicated.
We designed Wrike to help you manage basic tasks and tackle complex projects, thanks to its flexibility and options for customization.
Why you need Wrike to plan your projects
Explore Wrike’s project scheduling features today and find out how they can benefit your team.
Customizable workflows
Use a tailored workflow to keep track of your project schedule. Create custom statuses for your team so you can track every stage of your project, from “In Progress” to “Completed.”
Simple task assignment
Assign tasks to individual team members in seconds. Your colleague will receive an automatic notification in their inbox so they can get to work right away, ensuring your project stays on schedule.
Seamless email integration
Tired of scrolling through endless email threads for project updates? Keep all communication inside Wrike. Create tasks directly from Gmail and watch the information appear in your workspace.
Personalized dashboards
Build your own dashboard to monitor tasks and various project schedules. Use pre-built widgets or add custom ones to tailor your workspace and see the information you actually want to see.
This project schedule template will help you get up and running quickly with Wrike. Use it as a reference project to learn how Wrike works or to start managing a real project today.
We have created an extensive guide to show you how to manage a project in Wrike.
In this section, we’ll go through how to:
Break your project down into tasks and assign them
Plan your project using a Gantt chart
Monitor project progress using the dashboard
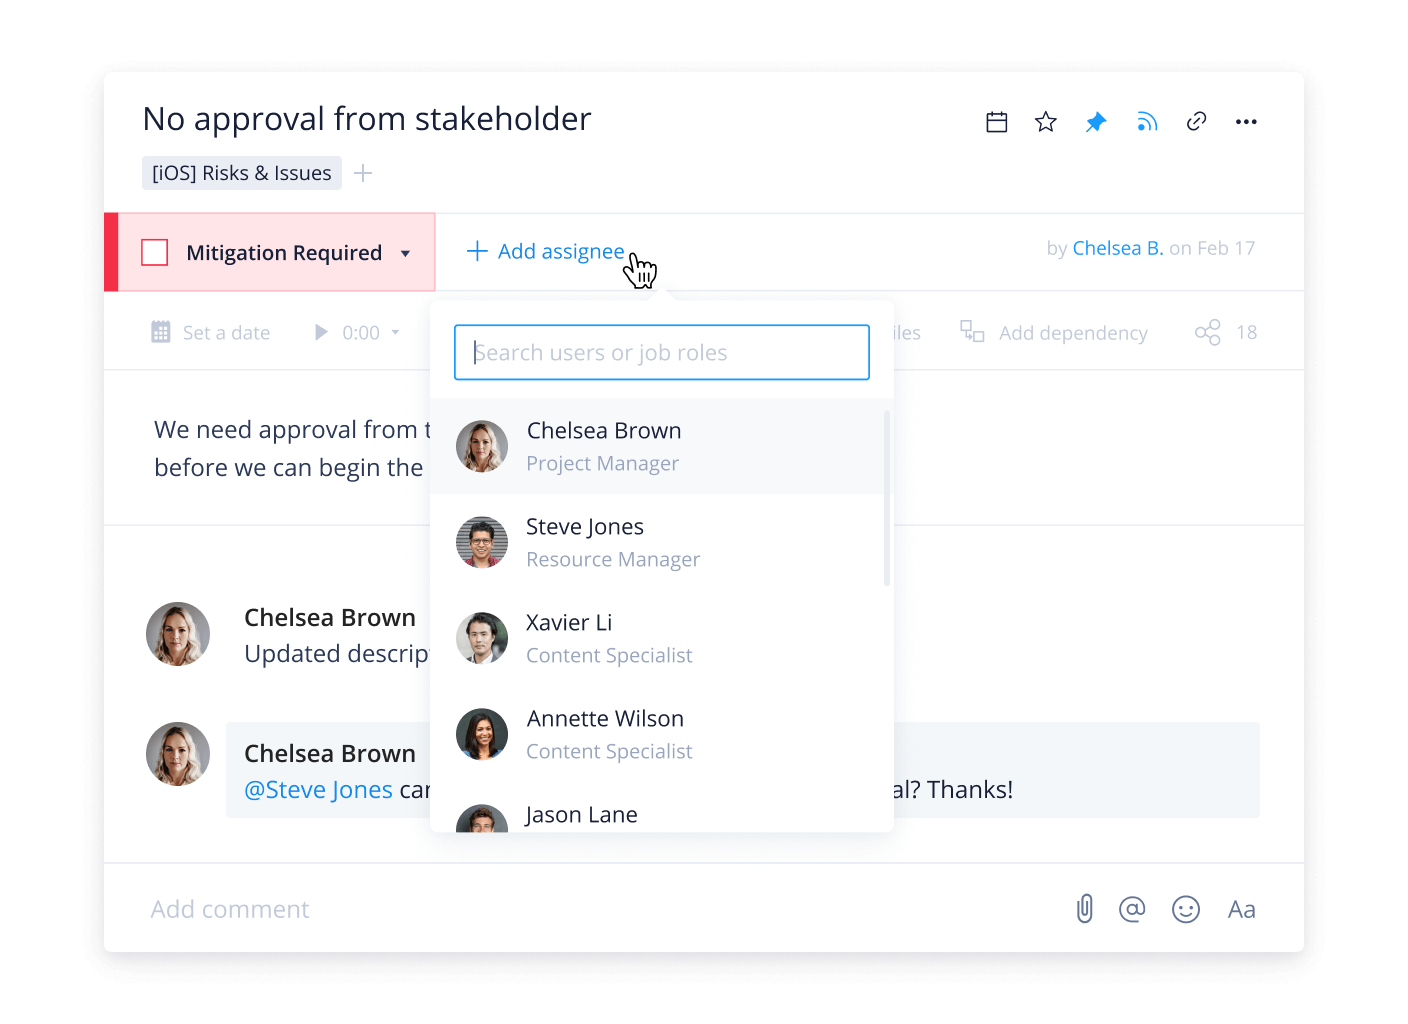
Break your project down into tasks
Tasks can be assigned to one or more members of your team, but a good rule of thumb is to try to create tasks that can be completed by one person to avoid confusion. To assign a task, select it from the list, click “Add assignee,” and select a member of your team. If the person isn’t in Wrike yet, simply add their email address, and an invitation to join Wrike will be sent to them.
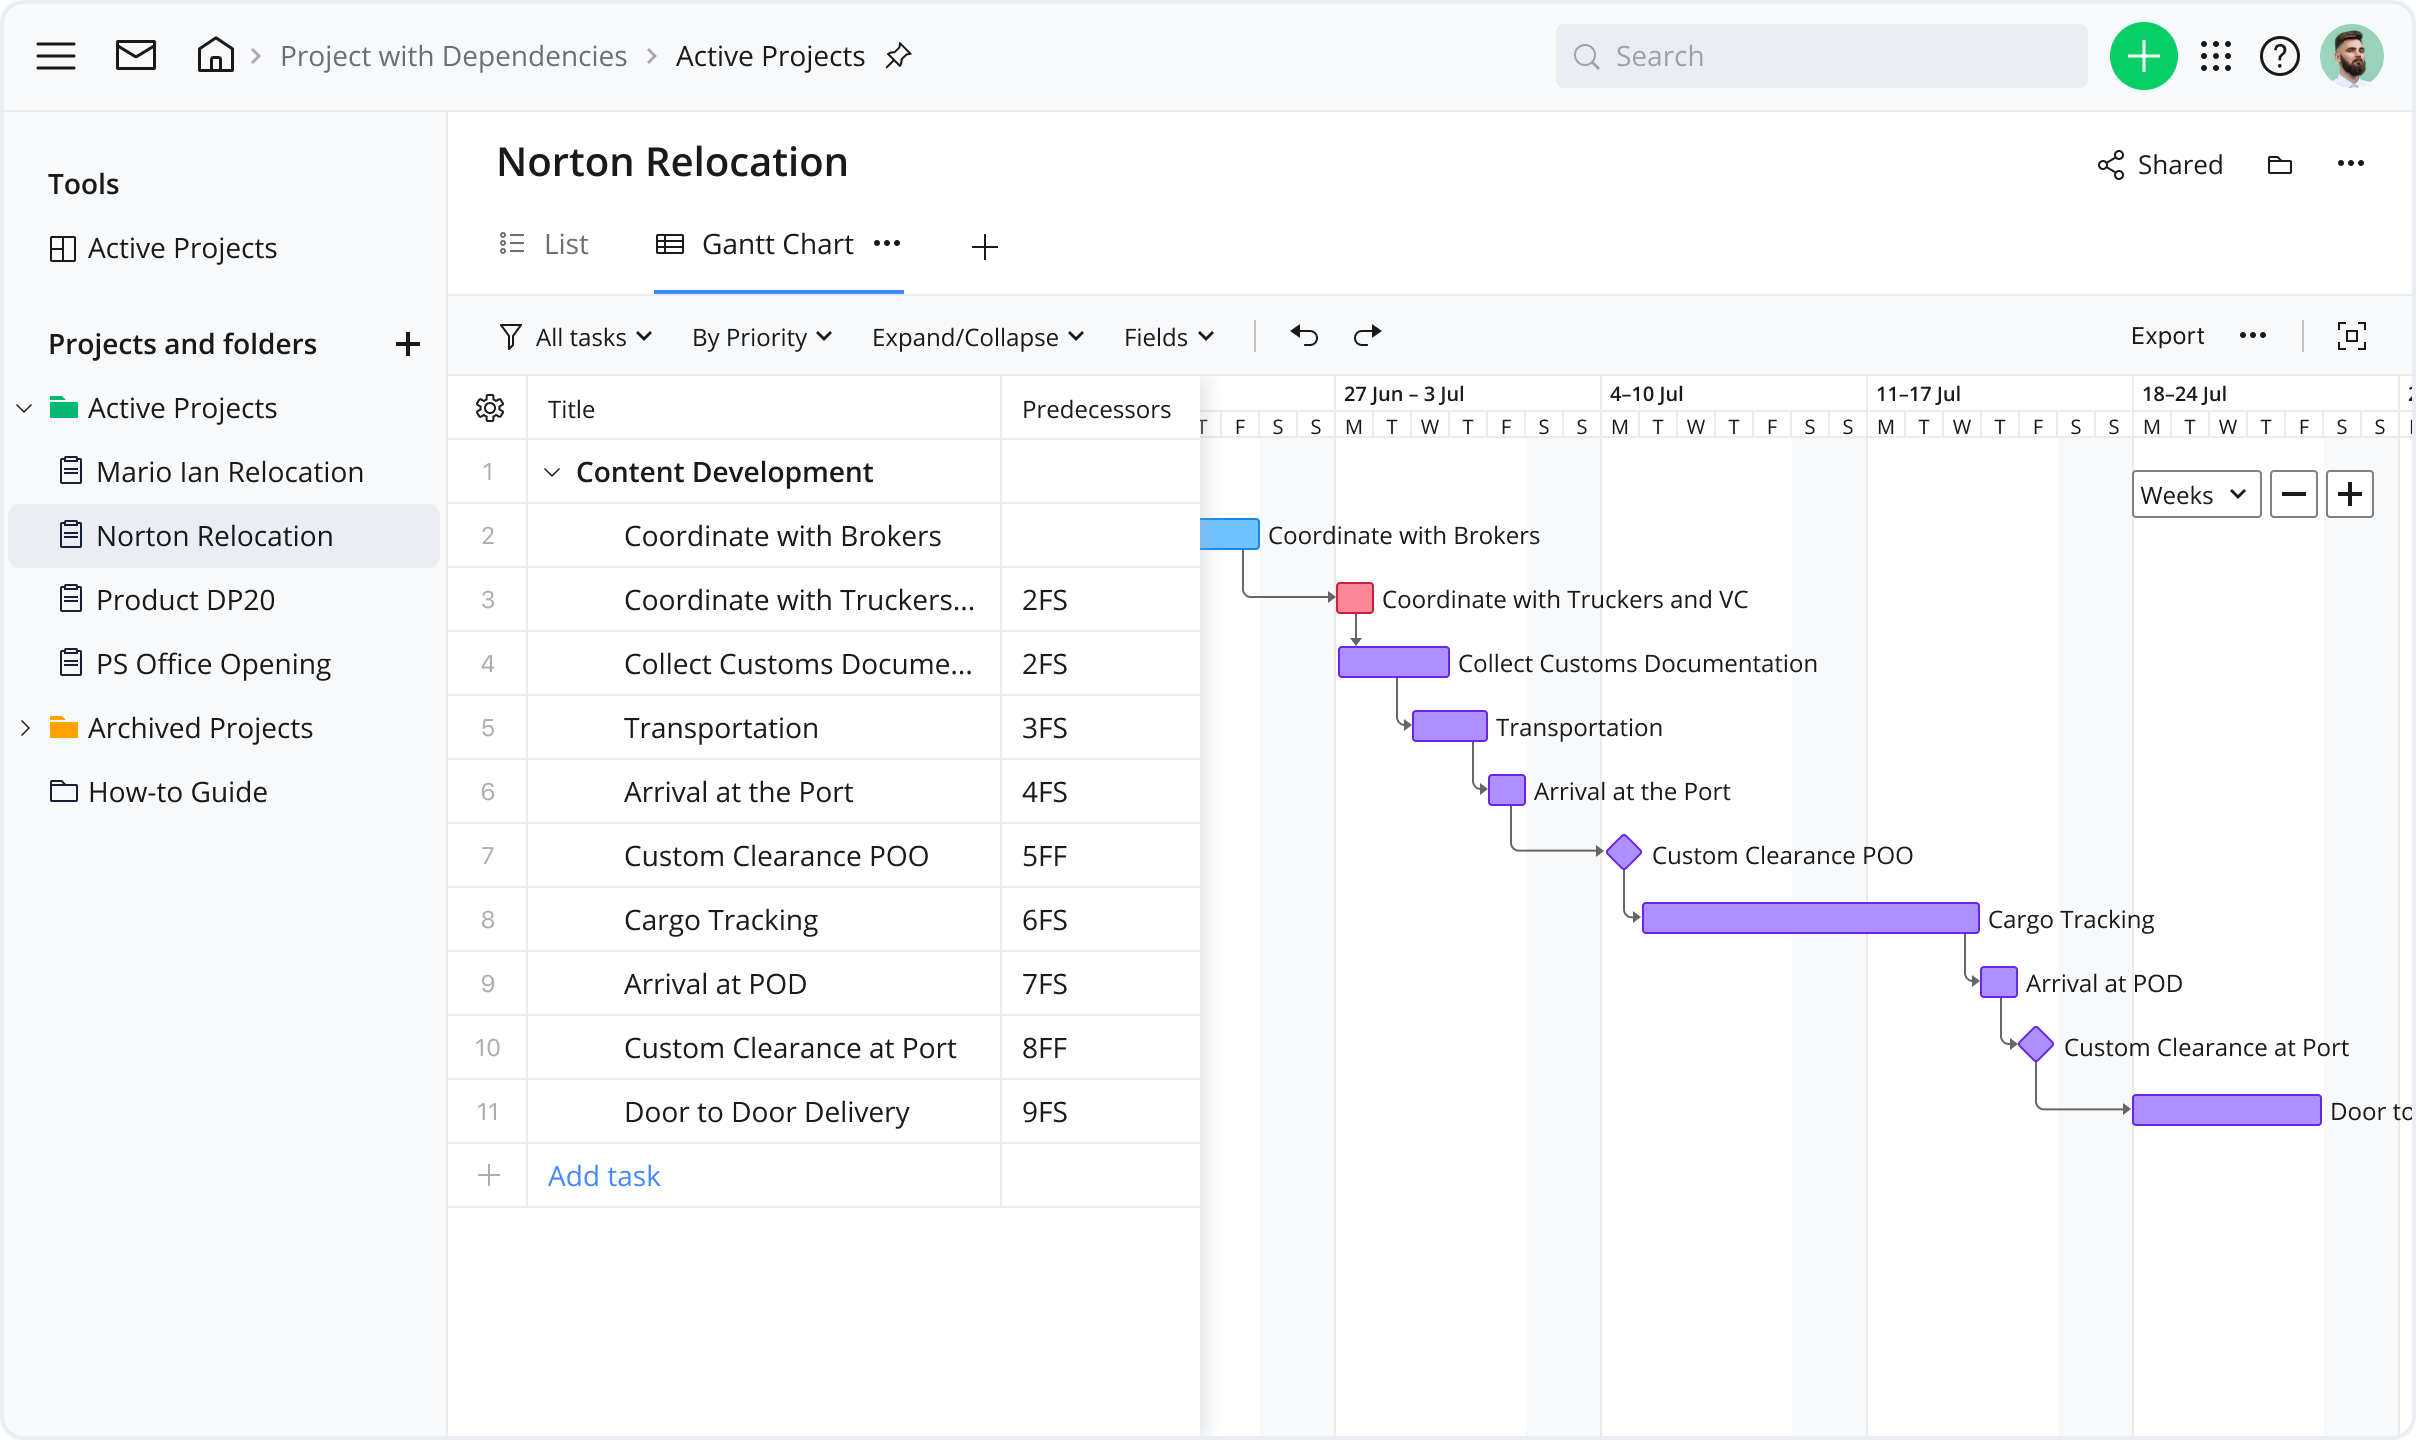
View progress with the Gantt chart
We designed the Gantt chart in Wrike to give you a high-level view of project progress and a complete picture of work scope in a way that’s visually easy to digest.
After you assign a task in Wrike, click the date selector to set the start and due dates. Once you schedule your tasks, you can use the Gantt chart view to see the overall project plan. From there, you can drag and drop tasks to adjust deadlines and dates. Our project scheduler’s dynamic timeline automatically adjusts everything around your changes, and all adjustments are automatically shared with your team.
Add milestones
In Wrike, you can use milestones as reference points to mark a major event or a branching decision point in a project. Milestones are tasks that are scheduled for one day and have no duration. You can turn any task into a milestone.
Wrike comes with a pre-built “Conflicts Monitor” widget. This displays all milestones in your account, which are shared with you and have scheduling conflicts.
Create dependencies between tasks
Wrike created task dependencies to allow you to specify the relationships between tasks. This makes it clear to team members where their responsibilities lie within the project timeline. You can use them to indicate when a task should begin or end in relation to other tasks. To create dependencies, drag and drop tasks within the Gantt chart.
Each time you change a task date, any dependencies will also automatically update to reflect your change.
Monitor your project with dashboards
We designed the dashboard on the project scheduling template to be configured to your unique needs. In a single view, you can see which tasks are unassigned, due this week, overdue, or completed. Use the dashboard to make decisions in an instant regarding iterations and task prioritization.
As with the rest of the project template, you can modify the dashboard specifically to your needs. Each widget shows tasks that meet specified criteria. You can use Wrike’s pre-built widgets or build custom widgets to see tasks that match the filters you apply.
Anyone can use Wrike’s project schedule template. As its name suggests, the project schedule template is designed to help break up a project’s timeline into manageable parts, plan tasks, and track progress. Project managers, students, and marketers, specifically, may find the project scheduling template useful.
You can use Wrike’s project scheduling template to track your project progress from start to finish. Use the timeline view to see important tasks and their due dates. You can also use your pre-configured dashboard to see completed, unassigned, due, and overdue tasks — making it simple to track work at every stage.
Use the timeline view to see the complete project schedule. This interactive Gantt chart allows you to see and reschedule tasks as needed.
You can notify team members by @mentioning them in a task comment within your project management schedule template or by making them an assignee if they are responsible for the task’s completion.
It is. Wrike is designed to be intuitive and easy to use as a whole, and we created this template to have everything pre-built for you to customize to your needs.
Begin writing your project schedule by breaking it down into important tasks and milestones
Assign dates and timelines to the tasks that will be then assigned to each team member
View the progress of your tasks with the Gantt chart and create dependencies between tasks, if any
Finally, monitor your project with custom dashboards to best suit your team’s needs. Read more helpful tips here